Tuning the Appearance of the Shell
The Shell window (“main window”) used by WPF application can be customized in a variety of ways. Individual themes make heavy use of that capability, creating wildly different appearances for the main window. However, one doesn’t always have to go to the extreme the individual themes do. Often, it can be very useful to simply tune the appearance of the shell and its behavior slightly. This quick tip shows how to tune the Workplace shell to take on different appearances. (Note that the techniques discussed in this topic also work with different themes).
By default the Workplace theme creates a single shell window which hosts all the normal views in a tabbed fashion. The tabs run across the bottom (following the standard set by Office 2013 applications such as Excel). The Ribbon shows all actions defined globally (in the StartViewModel, typically) and also all the view actions defined in each individual view. The pages in the Ribbon that are specific to the open view are highlighted using a special style (which can be customized by overriding the color definitions in the theme). The window title is the application title (as defined by the HomeController’s start method). Here’s an example that shows two views open in the standard Workplace shell:
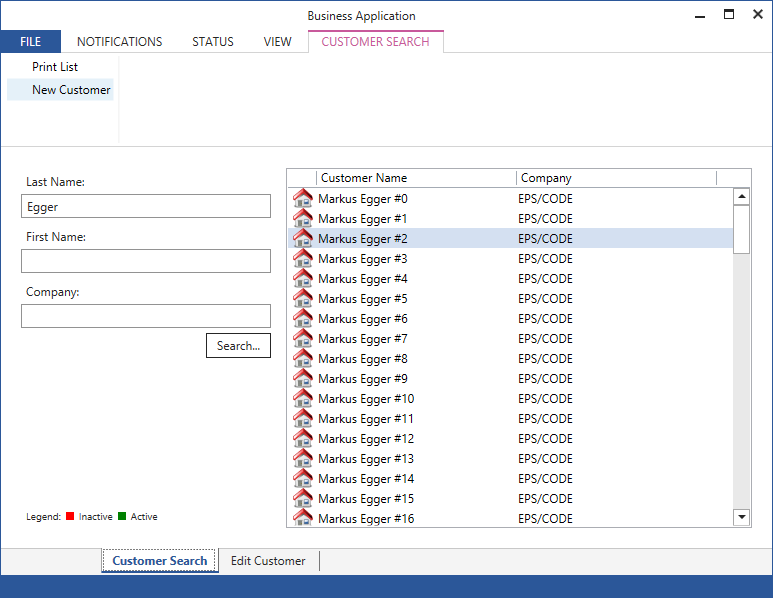
Note the tabs at the bottom, the window title, and the “Customer Search” page style in the Ribbon. Users can switch between the two open views (Customer Search, and Edit Customer respectively) using the tabs at the bottom.
This works very much like Excel does with multiple sheets in a spreadsheet. However, if we wanted the app to work more like Word, where each document opens a completely new main window, we could make a few minor adjustments. For one, we could indicate in the controller that the view we want to load desires to force a new top level window. This can be done like so:
public ActionResult Edit()
{
    return View(new EditViewModel(), forceNewShell: true);
}
This forces a new shell window to be opened for that specific view. Since we are now opening a new shell, we really do not need tabs across the bottom anymore. To change that, we can change the style of the shell. This sounds difficult, but really isn’t. Simply follow these steps:
- In the download section (on Codeplex), open the WPX XAML Resource Dictionary ZIP file, which conveniently breaks out theme resources into a single ZIP archive, saving you the trouble of digging through all the CODE Framework source code to find this.
- Find the Workplace-Shell.xaml file in the Workplace folder. In it, find the style definition with Key “CODE.Framework.Wpf.Mvvm.Shell-Style” (should be at the very top). Copy the whole definition of that specific style to the clipboard.
- Go to your project, which should already have a Themes\Workspace folder. Right-click and create a new resource dictionary and give it a name such as “Workplace-Shell.xaml” (the actual name doesn’t really matter).
- Copy the style into this new resource dictionary, which gives you a local copy of the style you can change to your heart’s content. (Further instructions follow below).
- The Workplace folder in your project should already contain a Workplace.xaml file. In that file, add a resource link to your new resource dictionary. Something like the following code example should do the trick (don’t override existing links though if there already are any!):
<ResourceDictionary xmlns="http://schemas.microsoft.com/winfx/2006/xaml/presentation"
                    xmlns:x="http://schemas.microsoft.com/winfx/2006/xaml">

  <ResourceDictionary.MergedDictionaries>
    <ResourceDictionary Source="Workplace-Shell.xaml" />
  </ResourceDictionary.MergedDictionaries>

</ResourceDictionary>
You are now ready to make changes to the style of the shell. The first thing we want to do is change the way the title is displayed. Since we intend to hide the tabs at the bottom, titles such as “Customer Search” will not be visible anymore, and we instead want to show those titles in the window title, such as “Customer Search – Business Application”. We can define this by changing the TitleMode property of the shell. To do so, make sure you have the following code in the style (the property may already be there and you may have to change its value, or you may simply have to add it):
<Style TargetType="mvvm:Shell" x:Key="CODE.Framework.Wpf.Mvvm.Shell-Style">
  <Setter Property="TitleMode" Value="ViewTitleDashOriginalTitle" />
Now, let’s hide the tabs. To do so, find the definition of the ViewHostTabControl in the template (a simple text search will do). In it, set the ShowHeaders property to false:
<mvvm:ViewHostTabControl ShowHeaders="False" …
This hides the headers/footers. Now all that’s left to do is adjust the behavior of the Ribbon to not show special colors. Find the definition of the view action ribbon and set the HighlightLocalCategories property to false.
<mvvm:ViewActionRibbon HighlightLocalCategories="False" ...
Done! Executing the same 2 views in the same app should now look something like this:
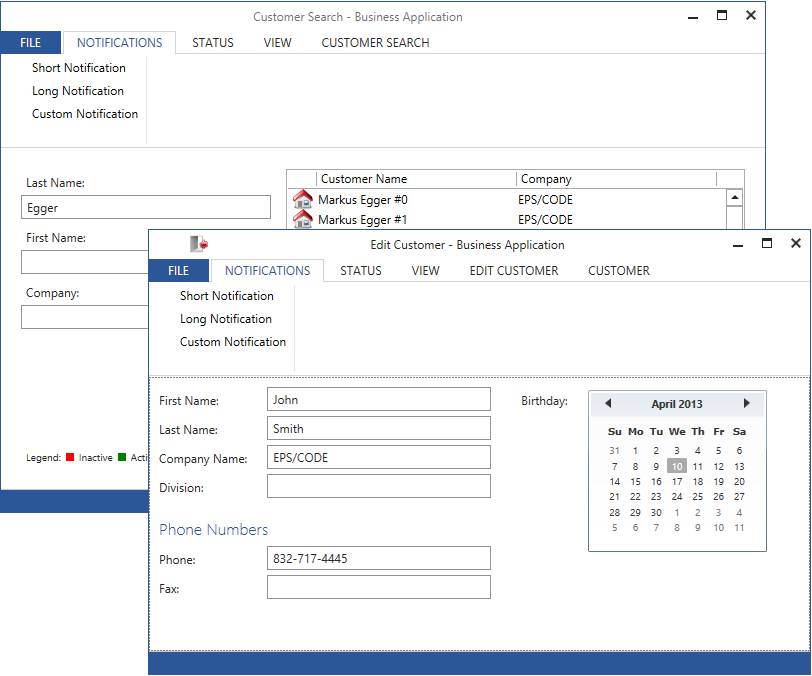
Compare the items specifically highlighted in the first screen shot (bottom tabs, window title, Ribbon style) with this screen shot.