Understanding Services in .NET Core
CODE Framework supports service features both in the classic .NET Framework as well as .NET Core. Fundamentally, those two environments are very similar and the creation of services is syntax compatible in both worlds, allowing for reuse of services across all flavors of .NET. However, the Core version of CODE Framework Services are the most up-to-date version and we recommend using the approach described in this topic over classic .NET Framework services.
In .NET Core, one usually creates the following service components:
- Service contracts, implemented as .NET Standard class libraries. This allows for the (re)use of these contracts in all .NET Standard compliant versions of .NET, including full/classic .NET Framework version v4.7+, .NET Core, and others. Since .NET Standard is also supported in the full framework, it is recommended to always create service contracts in .NET Standard class libraries.
- Service implementation, implemented as .NET Standard class libraries. Targetting .NET Standard for service implementation allows for hosting of services in all kinds of environments, ranging from classic/full .NET Framework v4.7+, to .NET Core and others (including support for both Linux and Windows). Not that in rare cases, services may be asked to perform tasks that are not (yet?) supported in .NET Core. In that case, service implementation may target other platforms, such as classic .NET Framework only. However, those cases are rare and growing rarer by the day. If in doubt, always aim to target .NET Standard.
- To host the service, create a .NET Core ASP.NET host application, which can then run on either Windows or Linux as desired.
- It is also possible (and in many cases recommended) to create a Docker hosting environment.
- It is also possible to host .NET Standard based services in the development host environment as well as all other previously supported hosting environments, such as WCF hosts and older-style WebApi hosting environments as long as these environments target at least the classic .NET Framework v4.7+.
Note: To fully understand CODE Framework Services, see Understanding CODE Framework Services
Creating Service Contracts
To create a service contract project, create a new class library project that targets .NET Standard 2.0. This can be done in various tools, such as Visual Studio Code or regular Visual Studio (among others). The following screen shot shows how this is done in Visual Studio 2019:
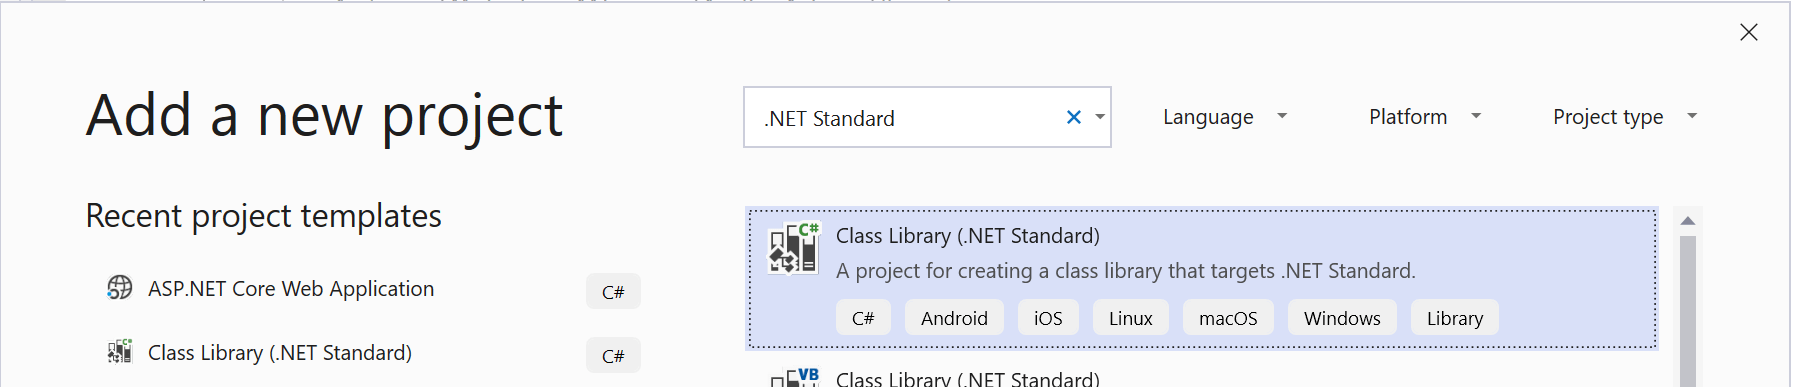
Note: It is recommended to use .NET Standard version 2.0 as the target platform, even though v2.x is available at the time of this writing. However, many environments (such as the classic .NET Framework) do not support .NET Standard 2.x and therefore, 2.x is too limited. This will probably change in the .NET Standard 3.x timeframe, but in the 2.x timeframe, we do not recommend targetting a later version unless you have some very specific reasons to do so.
Note: We are often asked whether one should target .NET Standard or .NET Core, and there is much confusion between these two terms. .NET Standard is simply a standardized feature-set of .NET that is supported on all kinds of .NET Platforms, including .NET Core. Therefore, targetting .NET Standard implicitly targets .NET Core as well. At the same time, it creates services and contracts that can also be used in other versions of .NET. Therefore, targetting .NET Standard is the most generic way to create services.
Once you create a new .NET Standard class library project, one needs to add a few NuGet references/packages to provide some relatively minor features used by CODE Framework services. The packages that have to be added are:
System.ServiceModel.PrimitivesCODE.Framework.Services.Contracts
The first is a package published by Microsoft that provides attributed CODE Framework services use, such as the OperationContract attribute. The second is a CODE Famework package that provides CODE Framework's Rest and RestUrlParameter attributes. Both of these packages are very leight-weight and do not introduce significant external dependencies and are thus suitable to be added to service contracts.
Once these packages have been added, one can create a service contract as described in the Understanding CODE Framework Services topic. The following code snippet is a service contract example:
[ServiceContract]
public interface ICustomerService
{
    [OperationContract]
    GetAllCustomersResponse GetAllCustomers(GetAllCustomersRequest request);

    [OperationContract]
    SearchCustomersResponse SearchCustomers(SearchCustomersRequest request);

    [OperationContract]
    GetCustomerResponse GetCustomer(GetCustomerRequest request);

    [OperationContract]
    SaveCustomerResponse SaveCustomer(CustomerInformation request);
}
Note that there is nothing special about this contract. It is exactly the same code as would have been used in the classic/full .NET Framework version of service contracts. In fact, older-style code can simply be reused and re-targetted for .NET Standard 2.0 in all but the most specialized cases.
The input parameters and return values are always based on full classes in CODE Framework (as opposed to simple value types, such as string or int). Here is an example of an input parameter (also often referred to as a “message”):
[DataContract]
public class GetCustomerRequest
{
    [DataMember(IsRequired = true)]
    public Guid CustomerId { get; set; } = Guid.Empty;
}
Note that these contracts create a most basic service contract. If a service was to be implemented based on this contract/interface it can be hosted in various ways, including REST/JSON. If REST/JSON was chosen as the standard, this service would default to the safest and most generic REST approach: It would be accessible through HTTP POST operations and it would require the request object to be posted as the payload.
Example: If this service is hosted on somedomain.com, it could be exposed as a https://somedomain.com/customers/getcustomer endpoint, and the request would have to be posted as the following JSON payload as part of the post operation:
{
  "CustomerId": "8BFA1EBC-C366-4A0E-B0FE-86B12F3A017D"
}
Note: The domain of the endpoint is a result of where the service is hosted (such as
localhostduring development, or a real domain in a production deployment). The/customers/part of the URL can be used to map to a specific service class. This is explained further below.
It is also possible to specifically craft the endpoint to be different. In this case, it would make sense to access the GetCustomer method using a different verb and a different name. Consider this version of the GetCustomer() definition in the contract:
[OperationContract]
[Rest(Method = RestMethods.Get, Name = "")]
GetCustomerResponse GetCustomer(GetCustomerRequest request);
In this case, the contract specifies that the method is to be accessible through a GET operation and the exposed method name is to be an empty string. This turns the potential URL into this: https://somedomain.com/customers. However, we probably also want to pass the customer ID on the URL. We can therefore also specify that the CustomerId property of the input parameter class can be passed on the URL as well:
[DataContract]
public class GetCustomerRequest
{
    [DataMember(IsRequired = true)]
    [RestUrlParameter(Mode = UrlParameterMode.Inline)]
    public Guid CustomerId { get; set; } = Guid.Empty;
}
Note:
RestandRestUrlParameterattributes are only considered when a service is hosted in CODE Framework as REST. All other hosting options that expose other protocols and standards will completely ignore REST-related attributes. It does not have any ill-affects when they are present however. For instance, if this service was to be hosted as a binary TCP/IP based service in WCF, the REST-attributes would simply be ignored. It is as if they were not even present in those scenarios.
This indicates to a REST hosting environment that the ID is passed on the URL, therefore, our endpoint can now be accessed through this URL: https://somedomain.com/customers/8BFA1EBC-C366-4A0E-B0FE-86B12F3A017D. Note that since this is accessible as a GET operation, one could simply type this URL into a browser's address bar and get the expected result.
In this example, the actual method that is being invoked is exposed without a name (an empty string for a name). Remember that the https://somedomain.com/customers part of the endpoint URL is simply a root configuration that exposes the entire service object (see both above and below for more information). Therefore, no further name is exposed on the URL and only an input parameter is passed along, which then maps to an input object with CODE Framework will create on the fly and pass along. It is also possible to specify other names of course. For instance, one could do this:
[OperationContract]
[Rest(Method = RestMethods.Get, Name = "cust")]
GetCustomerResponse GetCustomer(GetCustomerRequest request);
In this case, a potential full URL to access a customer record could be something like this: https://somedomain.com/customers/cust/8BFA1EBC-C366-4A0E-B0FE-86B12F3A017D
It is also possible to specify a manual full route for special cases, like this:
[OperationContract]
[Rest(Method = RestMethods.Get, Route = "load/customer/{CustomerId}")]
GetCustomerResponse GetCustomer(GetCustomerRequest request);
This would result in an endpoint URL like this: https://somedomain.com/customers/load/customer/8BFA1EBC-C366-4A0E-B0FE-86B12F3A017D
Note: It is not recommended to use the manually specified
Route, unless there is a specific reason to do so, because not all CODE Framework REST hosting environments support route definitions like this. However, ASP.NET Core hosting environments do support it. Note also that when a manual route is specified, it is also up to the developer to specify the parameters and where they appear.RestUrlParameterattributes on contracts will be ignored in those cases.
Many scenarios also require multiple parameters to be passed. Consider this input parameter object/contract:
[DataContract]
public class GetCustomerRequest
{
    [DataMember]
    [RestUrlParameter(Mode = UrlParameterMode.Inline, Sequence = 1)]
    public bool IsActive { get; set; } = true;

    [DataMember(IsRequired = true)]
    [RestUrlParameter(Mode = UrlParameterMode.Inline)]
    public Guid CustomerId { get; set; } = Guid.Empty;
}
In this example, presumably, two parameters are passed to the service. One indicating the customer ID and the other indicating some sort of active flag. Both have been flagged as URL parameters for REST operations. The IsActive flag (which default to true) is not flagged as required, and it is set to be the second parameter through the Sequence setting (the default for the sequence is 0, therefore, sequence 1 is after the other property which defaults to 0). Therefore, our endpoint URL is now the following: https://somedomain.com/customers/8BFA1EBC-C366-4A0E-B0FE-86B12F3A017D/false. However, since the value is not flagged as required, we can also access this endpoint, in which case the IsActive flag would be set to true per its default: https://somedomain.com/customers/8BFA1EBC-C366-4A0E-B0FE-86B12F3A017D.
All these examples we have used so far used the HTTP GET verb/operation. However, URL parameter mapping also works on other verbs, such as POST. Consider this input contract, which still has the IsActive flag, but has no URL parameter mapping:
[DataContract]
public class GetCustomerRequest
{
    [DataMember]
    public bool IsActive { get; set; } = true;

    [DataMember(IsRequired = true)]
    [RestUrlParameter(Mode = UrlParameterMode.Inline)]
    public Guid CustomerId { get; set; } = Guid.Empty;
}
Now let's also assume that for some (strange) reason, we want to us a POST verb to access this service:
[OperationContract]
[Rest(Method = RestMethods.Post, Name = "")]
GetCustomerResponse GetCustomer(GetCustomerRequest request);
We could thus now post to this endpoint yet still pass the CustomerId paramater on the URL: https://somedomain.com/customers/8BFA1EBC-C366-4A0E-B0FE-86B12F3A017D. However, the IsActive flag would either default to true, or we would have to post the following payload:
{
  "IsActive": false
}
It is even valid to post a fully formed request object like this:
{
  "CustomerId": "8BFA1EBC-C366-4A0E-B0FE-86B12F3A017D",
  "IsActive": false
}
However, in this case, if the CustomerId of the payload does not match the customer ID passed on the URL, the URL version will win out and override the one in the payload.
Note: See the discussion about creating an ASP.NET Core hosting environment below for further details about URL patterns.
For a more complete discussion on the REST related attributes supported by CODE Framework, see Creating REST Services.
Creating a Service Implementation
To create a service implementation, create another .NET Standard project (as described above) and add a reference to the service contract project (see also above). Since .NET Standard projects understand the dependencies of other .NET Standard projects (the service contract project in this case), it is not necessary to add any other dependencies as far as CODE Framework is concerned.
Note: It may often to be necessary to add other dependencies depending on what the service does. For instance, if the service accesses Azure features, then such dependencies may need to be added. Or if the service accesses SQL Server, then those dependencies and packages will have to be added. Another example of further dependencies are Milos Solution Platform business objects.
It is generally recommended to implement services in .NET Standard 2.0, just like the same recommendation applies for contracts (see above). However, in some cases, it may not be possible to stick with .NET Standard. For instance, a service implementation may have to access Windows-speficic features, or it may have to use a third-party library that is not .NET Standard compliant. In those cases, other target platforms will have to be chosen. However, one should always strive to target .NET Standard and one should only deviate from that approach if absolutely required.
The actual implementation of the service is no different from any other CODE Framework services. For instance, the CustomerService.GetAllCustomers() implementation of the ICustomerService contract could look like this:
public GetAllCustomersResponse GetAllCustomers(GetAllCustomersRequest request)
{
    try
    {
        var response = new GetAllCustomersResponse();

        using (var biz = new CustomerBusinessObject)
        {
            var customers = biz.GetAllCustomers();
            Mapper.Map(customers.Tables[0], response.Customers);
        }

        response.Success = true;
        return response;
    }
    catch (Exception ex)
    {
        LoggingMediator.Log(ex);
        return new GetAllCustomersResponse { Success = false, FailureInformation = "Generic fault..." };
    }
}
There is nothing special about this code being .NET Standard or .NET Core. It is 100% identical to all other CODE Framework service implementations and is only shown here for completeness.
Standardized Exception Handling
In the above example, a catch-block handles all exceptions within the service call, which is our recommended pattern. CODE Framework even has standardized features to make it easier to log the exception and return an appropriate response. The above example can also be written like this:
public GetAllCustomersResponse GetAllCustomers(GetAllCustomersRequest request)
{
    try
    {
        var response = new GetAllCustomersResponse();

        using (var biz = new CustomerBusinessObject)
        {
            var customers = biz.GetAllCustomers();
            Mapper.Map(customers.Tables[0], response.Customers);
        }

        response.Success = true;
        return response;
    }
    catch (Exception ex)
    {
        return  ServiceHelper.GetPopulatedFailureResponse<GetAllCustomersResponse>(ex);
    }
}
This does a number of things. For one, it creates an instance of GetAllCustomersResponse. If that class is either derived from ServiceBaseResponse, or if the type has Success and FailureInformation properties, then those properties will be populated appropriately. Success will be set to false. FailureInformation will be populated with a generic message indicating the type and method that triggered the error (but no further detail to not give away information to potential hackers) if the app is in Release mode. If the app is in Debug mode on the other hand, detailed exception information will be provided in FailureInformation.
The second thing that happens is that a standardized log message with detailed exception information will be sent to LoggingMediator.Log() if the CODE.Framework.Fundamentals package is included in the current service implementation. Depending on the configuration of the logging mediator, the logged message will show up in different places.
Exposing a Ping Service
One other standard feature provided by CODE Framework that is often useful in services is to provide a Ping operation that allows pinging the service to see if it is running, and getting some details about the service. We could add such an operation to our ICustomerService like ths:
[ServiceContract]
public interface ICustomerService
{
    [OperationContract, Rest(Method = RestMethods.Get)]
    PingResponse Ping(PingRequest request);
The PingResponse and PingRequest types are provided by the standard CODE.Framework.Services.Contracts package, which also provides things like the Rest attribute, and thus is already included in the project.
The implementation of the Ping operation can be done easily through a helper class:
public class CustomerService : ICustomerService
{
    public PingResponse Ping(PingRequest request) => this.GetPopulatedPingResponse();
GetPopulatedPingResponse is a helper extension-method made available through a ServiceHelper static class. It collects information such as server time, server OS version, server Framework version, and version of the current assembly. This is useful in a variety of scenarios. Often, it can be useful to just be able to ping a REST service through a browser operation.
Note: There also is a down-side to exposing this operation, as it provides additional information about the service and the environment the service runs in. This information could potentially be used by hackers to understand what your service is like. There is no inherent technical weakness in this, but one always has to decide how much information to give away to potential hackers.
Special Case: Returning Files from a Service
Sometimes, it is desirable to return the contents of a file from a service. This could be a simple file, such as an image, or it could be a PDF or Word document, or anything else, for that matter. (Note: Files that are very large and need to be streamed - like videos - are probably not ideal for this feature).
When returning a file, there are usually three elements that are included:
- The actual file bytes as a byte-array
- The file name
- The content-type of the file (such as
image/png)
CODE Framework defines a special response type that can be used for such a scenario. This is provided for convenience, but also to enable some special features in some scenarios. (Specifically: RESTful services can return files as pure file responses, rather than encoding the file in JSON and base64). To take advantage of this feature, define a service operation that uses FileResponse as the response contract on one of the methods of your interface:
[OperationContract]
[Rest(Method = RestMethods.Get, Route = "photo/{CustomerId}")]
[RestContentType("image/png")]
FileResponse GetCustomerPhoto(GetCustomerPhotoRequest request);
While the request contract still needs to be defined by the developer (and can include anything desired), the response is the pre-defined FileResponse type. This response type defines the three expected members, and can be used like so:
public FileResponse GetCustomerPhoto(GetCustomerPhotoRequest request)
{
    /// Real code goes here
    return new FileResponse
    {
        FileName = "ExampleImage.png", // File name as it appears to the caller, regardless of actual file name
        FileBytes = Resources.RocketMan, // Load your file bytes here
        ContentType = "image/png" // Could be changed for each returned photo if needed
    };
}
As you can see, this looks much like any other CODE Framework service method/operation. And in many ways it is. However, if this operation is called through a RESTful operation, the file (an image, in this example) is returned as a raw file. This is especially useful, if the service is callable using a GET verb. In this example, one could simply use a browser and navigate to a URL such as http://localhost:5000/photo/123 and see the image in the browser, rather than the JSON-encoded version of the image data. In fact, one could use this response directly in an HTML <img> tag, like this: src="https://raw.githubusercontent.com/codeframework/docs/master/http://localhost:5000/photo/123".
Note that if the same service is called from a non-REST client, or even if the REST service is called from C# using ServiceClient.Call<>(), the service will work as always:
ServiceClient.Call<ICustomerService>(s => {
    var response = s.GetCustomerPhoto(new GetCustomerPhotoRequest { Id = "123" });
    Console.WriteLine(response.FileName);
    Consolw.WriteLine($"File length: {response.FileBytes.Length}");
});
Note:
FileResponseis a sealed class that cannot be extended. This is due to the fact that the file data is used as the complete body, and the file name and content-type are encoded in the HTTP header. It is not possible to add additional properties (members) to the response contract, as there is nowhere to put that information in the REST scenario, without creating a non-standard response. If additional data elements are needed, a completely different resposne type should be created.
Note: The definition of the interface method makes use of the
RestContentTypeattribute. This is for documentation purposes only, and is used mainly by OpenAPI/Swagger (see below). It has no impact on the actual behavior. It is also possible for the response to return a different content-type (such as if photos were loaded from the database and varied in file format). This may be confusing for the person using OpenAPI or Swagger UI, but it may make sense in some scenarios. However, we recommend that the documentation attribute indicates a content-type consistent with what the service actually returns. (Note: Since the content-type property is set during runtime, and can be changed at will, it is not possible for the OpenAPI features to determine the content-type, thus requiring the need of this documentation attribute. If the attribute is not specified, a content-type ofapplication/x-binaryis assumed, but it will likely be different at runtime.)
Hosting REST/JSON Services in ASP.NET Core
The service that has been created so far can be hosted in many different ways. One of the most interesting approaches for .NET Core developers is to host it in an ASP.NET Core application.
To do so, create a new empty ASP.NET Core application by first selecting this:
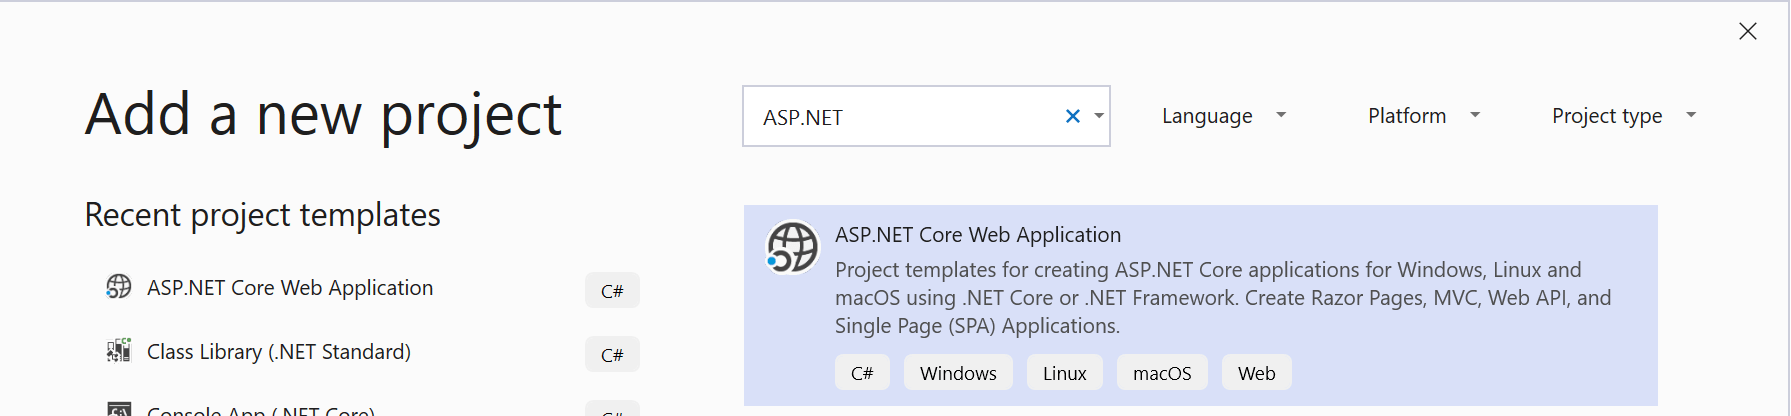
Then, after specifying a name and location for the project, pick this:
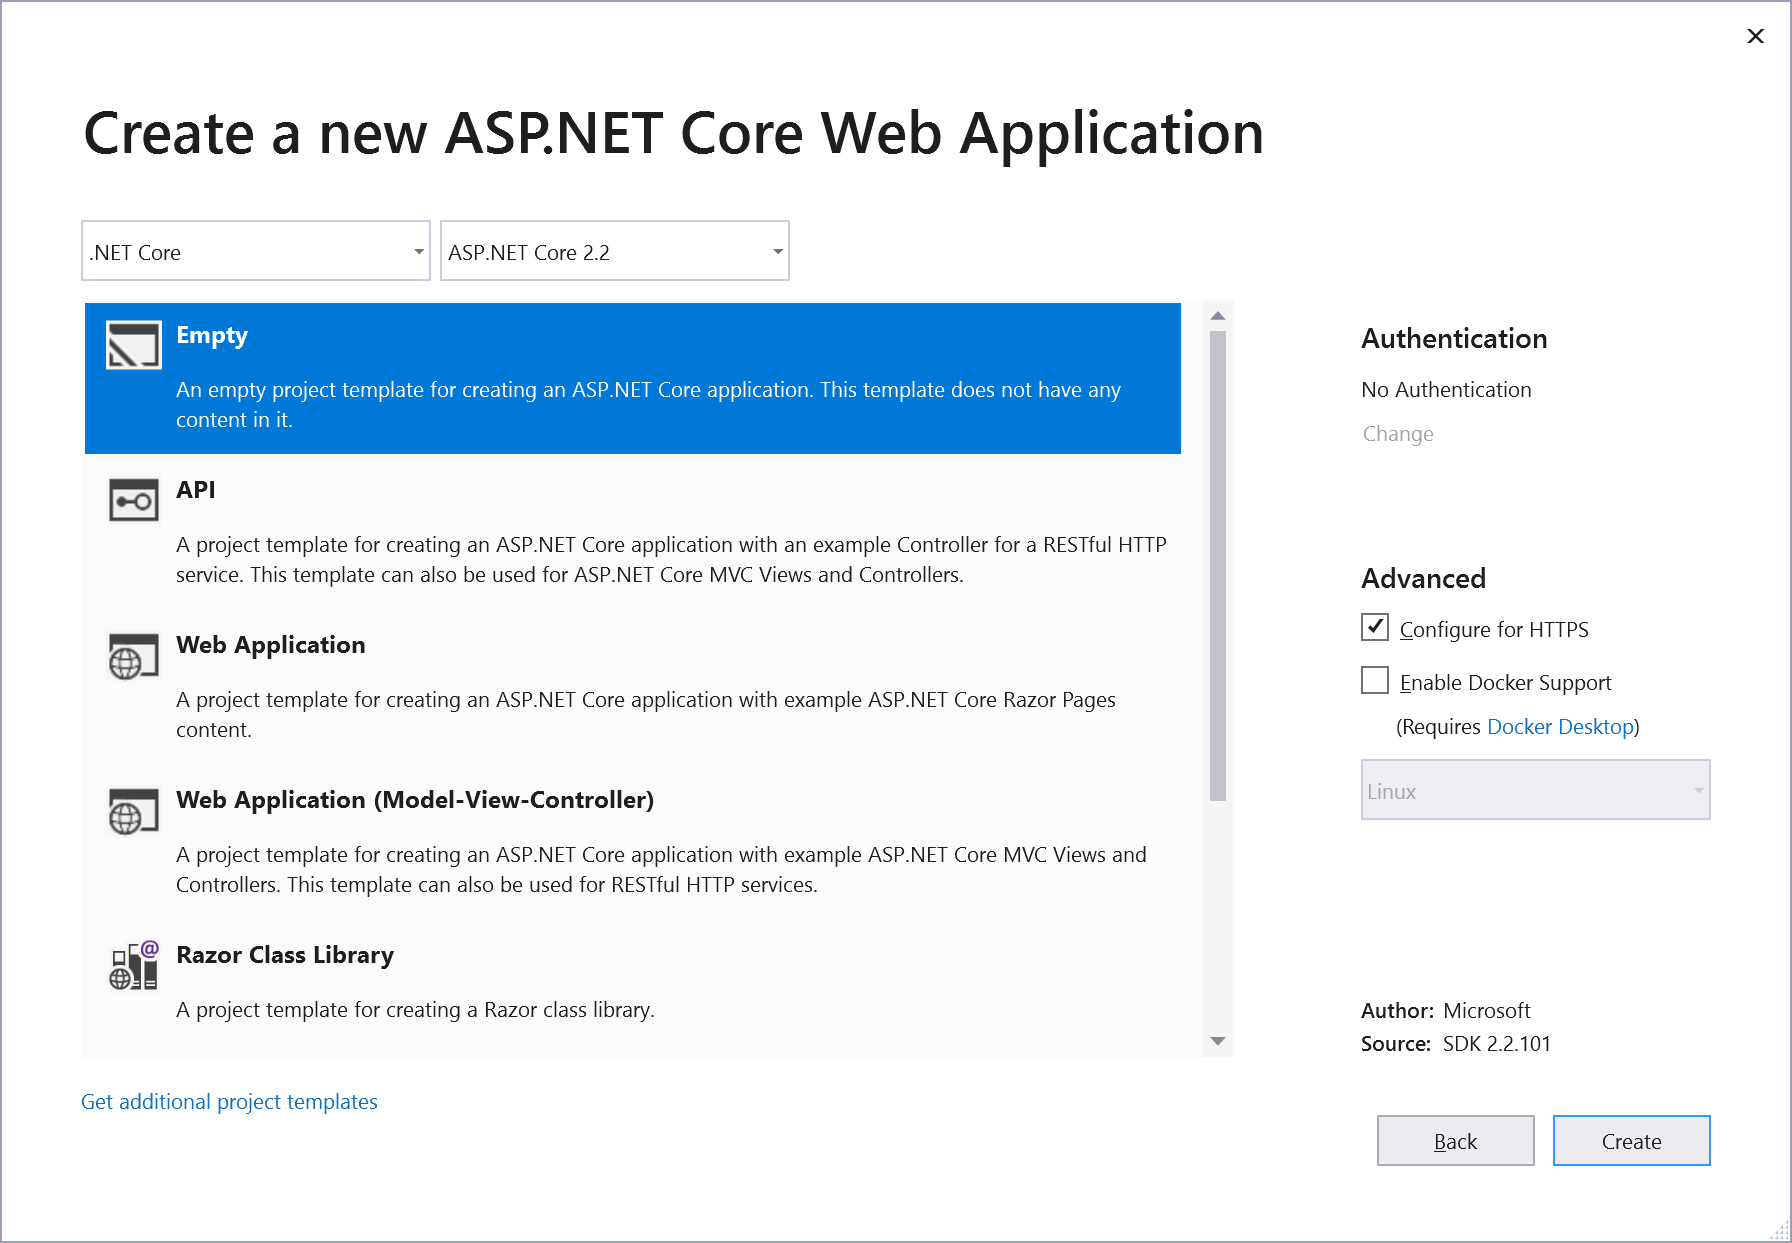
This creates the most basic and leight-weight ASP.NET Core environment. All we need to do now is add what we need, which is:
- A reference to the service implementation project (which will inherently bring along all dependencies that project may have).
- The
CODE.Framework.Services.Servver.AspNetCoreNuGet package, which provides everything needed to host CODE Framework REST/JSON services in ASP.NET Core.
Now that we have everything available that is needed, we can tell the ASP.NET Core environment to use the CODE Framework service hosting infrastructure. This can be done in the Startup.cs file of the project. Here is the full version of what that file needs to contain:
using CODE.Framework.Services.Server.AspNetCore;
using CODE.Framework.Services.Server.AspNetCore.Configuration;
using Microsoft.AspNetCore.Builder;
using Microsoft.AspNetCore.Hosting;
using Microsoft.Extensions.Configuration;
using Microsoft.Extensions.DependencyInjection;

namespace PressReleaseCoreService
{
    public class Startup
    {
        public Startup(IConfiguration configuration) => Configuration = configuration;

        public IConfiguration Configuration { get; }

        public void ConfigureServices(IServiceCollection services) => services.AddServiceHandler(config => { });

        public void Configure(IApplicationBuilder app, IHostingEnvironment env, ServiceHandlerConfiguration config) => app.UseServiceHandler();
    }
}
Some of this will already be in your Startup.cs file as it was created by default. The most important parts of this - as far as CODE Framework is concerned - are the lines that call AddServiceHandler() and app.UseServiceHandler(), which wire up the CODE Framework infrastructure. For this to work, the two using lines at the top must also be present. Voila! You are ready to host services now!
Note that some ASP.NET Core fundamentals should already be in place based on the default project setup created for you. However, just in case, make sure that the Program.cs file includes the following code:
using Microsoft.AspNetCore;
using Microsoft.AspNetCore.Hosting;

namespace PressReleaseCoreService
{
    public class Program
    {
        public static void Main(string[] args) => BuildWebHost(args).Run();

        public static IWebHost BuildWebHost(string[] args) =>
            WebHost.CreateDefaultBuilder(args)
                   .UseStartup<Startup>()
                   .Build();
    }
}
Specifying the Hosted Services
All that remains now is to specify which services are to be hosted and what the exposed endpoints should be like. There are two fundamental ways to do so:
- By programmatically specifiying which services are to be hosted during startup.
- By defining the hosted services in the
appsettings.jsonconfig file.
The most common way is through the config file, so we will cover that option first. To host the customer service, your appsettings.json file should contain the following:
{
  "Logging": {
    "LogLevel": {
      "Default": "Warning"
    }
  },
  "AllowedHosts": "*",
  "ServiceHandler": {
    "Services": [
      {
        "ServiceTypeName": "MyCustomerService.Implementation.CustomerService",
        "AssemblyName": "MyCustomerService.Implementation.dll",
        "RouteBasePath": "/customers"
      }
    ]
  }
}
The only part of interest here is the ServiceHandler section. It defines an array of services to be hosted (you can have as many as you want). In this example, the service we host is a class called ‘MyCustomerService.Implementation.PressReleaseService’ (substitute your full class name) which is stored in a DLL called MyCustomerService.Implementation.dll (again, substitute your DLL file name here). Note that this is the same file that we added a project reference to (see above).
The final configuration setting is the “base path”, which is set to /customers. This explains where the "/customers/" part of a URL such as https://somedomain.com/customers/8BFA1EBC-C366-4A0E-B0FE-86B12F3A017D comes from (see above). It links that part of the endpoint URL to the CustomerService class as a whole. This is important to have, as it allows multiple services to be hosted in the same ASP.NET Core app. Note that it is possible to set this to just about anything you want. “/api/customers/service” is just as much a valid setting (resulting in URLs such as https://somedomain.com/api/customers/service/8BFA1EBC-C366-4A0E-B0FE-86B12F3A017D) as an empty string (resulting in URLs such as https://somedomain.com/8BFA1EBC-C366-4A0E-B0FE-86B12F3A017D).
To host multiple services, the service handler configuration could look like this:
"ServiceHandler": {
  "Services": [
    {
      "ServiceTypeName": "MyCustomerService.Implementation.CustomerService",
      "AssemblyName": "MyCustomerService.Implementation.dll",
      "RouteBasePath": "/customers"
    },
    {
      "ServiceTypeName": "MyCustomerService.Implementation.InvoiceService",
      "AssemblyName": "MyCustomerService.Implementation.dll",
      "RouteBasePath": "/invoices"
    }
  ]
}
As mentioned above, it is also possible to configure services in source code rather than in a config file. In that case, no ServiceHandler section is added to the JSON configuration file. Instead, code like the following is to be added in the ConfigureServices() method of Startup.cs:
public void ConfigureServices(IServiceCollection services)
{
    services.AddServiceHandler(config =>
    {
        config.Services.Clear();

        config.Services.AddRange(new List<ServiceHandlerConfigurationInstance>
        {
            new ServiceHandlerConfigurationInstance
            {
                ServiceType = typeof(CustomerService),
                RouteBasePath = "/customers",
                JsonFormatMode = JsonFormatModes.CamelCase
            }
        });

        config.Cors.UseCorsPolicy = true;
        config.Cors.AllowedOrigins = "*";
    });
}
This is functionally identical to the JSON configuration example above. Except that in this case, Cors (cross-domain) settings were added as well as an additional configuration setting that specifies specifics about how JSON objects are serialized (but these are also supported in the config file).
The advantage of using the programmatic approach is that some extra features are available. Most importantly, an OnAuthorize delegate can be used to perform a custom authorization task. Here is an example:
public void ConfigureServices(IServiceCollection services)
{
    services.AddServiceHandler(config =>
    {
        config.Services.Clear();

        config.Services.AddRange(new List<ServiceHandlerConfigurationInstance>
        {
            new ServiceHandlerConfigurationInstance
            {
                ServiceType = typeof(CustomerService),
                RouteBasePath = "/customers",
                JsonFormatMode = JsonFormatModes.CamelCase,
                OnAuthorize = context =>
                {
                    // fake a user context
                    context.HttpContext.User = new ClaimsPrincipal(new ClaimsIdentity(new[]
                    {
                        new Claim("Permission", "CanViewPage"),
                        new Claim(ClaimTypes.Role, "Administrators"),
                        new Claim(ClaimTypes.NameIdentifier, "Rick S. Cust")
                    }, "Basic"));

                    return Task.FromResult(true);
                }
            }
        });

        config.Cors.UseCorsPolicy = true;
        config.Cors.AllowedOrigins = "*";
    });
}
You are now ready to launch your application. If you are using Visual Studio, you can simply hit F5. If you use Visual Studio Code, you can type dotnet run into your console window. You can then start hitting the hosted services. If you are hosting services with a GET verb, you can simply use a web browser to browse to the service URLs. If you are using more complex REST services, use a tool such as Fiddler or PostMan (among others) to give your services a spin.
Note: When services are hosted in .NET Core as explained here, debugging is fully supported. It is possible to simply add a breakpoing to the service implementaiton code, even if the ASP.NET Core application is run as a Linux-based application.
In-Process Hosted Services
There are scenarios, where one might want to use services as “local object” or "in-process objects/calls". For instance, imagine architecting a micro-service based system by creating a number of independent micro-services, some of which call each other. One such example might be a service that can do certain calculations that is called from a variety of other services. Now suppose this system works beautifully, but you discover that one of the services ends up calling the calculation service very often and in a repeated loop, and this turns out to be a performance problem, as calling to a service “out of process” at some server location, with all the serialization of data and network connections and everything else that goes with service calls. Wouldn't it be nice to then be able to say "but I have the service object I could just use as a .NET DLL, so I just want to re-configure my system to not make this repeated round-trip to another server and instead just call the object as a local instance, without changing any of my code". That, in a nutshell, is what in-process service hosting allows you to do.
To host a service in-process, use a class called ServiceGardenLocal and add the desired service implementation objects to it. This type is defined in the CODE.Framework.Serices.Client package/DLL and is thus available everywhere you might want to use ServiceClient.Call().
Note: You will need a reference to the service's implementation DLL and all its dependencies included in the calling service, as these objects literally become local object instances.
To host a service in-process, add the following code to the startup of your service project (no matter what type of .NET project it is):
ServiceGardenLocal.AddServiceHost(typeof(CalculationService));
Using this configuration, the project can now make a call to this service like so anywhere in your app:
ServiceClient.Call<ICalculationService>(s =>
{
    var response = s.Calculate(new CalculationRequest{});
});
As you can see, this code is just like any other service call from C#. However, since the requested service is hosted in-process, the system understands that it can simply create a local instance of CalculationService to satisfy the need to use a service based on the ICalculationService contract/interface. Since this is simply a local .NET object, with no networked call, no serialization/deserialization, or any other overhead, this will be very fast and exhibit the same performance characteristics as calling any other .NET object instance.
Nevertheless, micro-service architecture is still preserved. Think of this simply as a configuration choice. And, in fact, one could simply re-configure this same system to utilize a different standard (like REST or gRPC) and all the service invocation code would remain unchanged and continue to work. This provides great architectural and deployment freedom.
OpenAPI Support (“Swagger”)
Services/APIs hosted in CODE Framework on ASP.NET Core now offer Support for OpenAPI. Open API (formerly known as “Swagger”) is a standardized service description that can be used in a variety of ways. For instance, Swagger UI (yes, it is still called that) can be used to display information about the service and test the service. Other tools (such as Swagger Codegen - https://swagger.io/tools/swagger-codegen/) can be used to generate JavaScript client-side stub methods for easier access.
To enable OpenAPI support in CODE Framework services,
public void Configure(IApplicationBuilder app, IHostingEnvironment env, ServiceHandlerConfiguration config)
{
    app.UseOpenApiHandler(); // Enables OpenAPI in addition to hosting services
    app.UseServiceHandler();
}
app.UseOpenApiHandler() enabled CODE Framework's OpenAPI features. Now that this feature is activated, you can start the app and browse to /openapi.json within your root domain (typically something like http://localhost:5000/openapi.json during development) to see a JSON-based description of your service/API. This description in itself is not very useful, but it is used by a variety of tools and technologies to interact with your service.
Note: Depending on the nature of your service, you may not want to expose an OpenAPI definition file in production for the entire world to see.
Fine-Tuning the OpenAPI definition
It is possible to fine-tune some of the details of the exposed information, when activating the OpenAPI features. Consider this example:
public void Configure(IApplicationBuilder app, IWebHostEnvironment env, ServiceHandlerConfiguration config)
{
    app.UseOpenApiHandler(info: new OpenApiInfo
    {
        Title = "CODE Framework Service/API Example",
        Description = "This service/api example is used to test, demonstrate, and document some of the CODE Framework service/api features.",
        TermsOfService = "http://codeframework.io",
        License = "MIT",
        Contact = "info@codemag.com"
    });

    app.UseServiceHandler();
}
This is an example for information that is not usually part of a service/API contract definition, but can be injected into the OpenAPI definition.
CODE Framework does an extensive job at inspecting the service contract defined in C# and exposing as much information as possible in the OpenAPI definition. This includes a deep inspection of all hosted services and service interfaces, all methods, all parameters and return values, and all properties (and sub-properties, and sub-sub-properties, and…). CODE Framework will inspect attributes put on types, methods, and properties (see below). CODE Framework also inspects potential XML documentation files, if they are used and present (typically, XML docs are only available during development time). In addition, CODE Framework takes the liberty to expose additional information it deems intersting (such as adding descriptive information about enum values, which would otherwise just be numbers).
Here is an example of a contract that takes advantage of these features:
[ServiceContract]
[Summary("Services/API related to user management")]
[Description("This service includes all kinds of operations related to user management, such as login/logout, user CRUD operations, and so on.")]
[ExternalDocumentation("For more information, please refer to the external documentation.", "https://docs.codeframework.io")]
public interface IUserService
{
    [Summary("Signout/logout user")]
    [Description("This method logs the specified user out of the system and returns information indicating `success` or `failure`.")]
    SignoutResponse Signout(SignoutRequest request);
}

[DataContract]
public class SignoutRequest : BaseServiceRequest
{
    [DataMember(IsRequired = true)]
    [Description("User name, typically an email address.")]
    public string UserName { get; set; } = string.Empty;
}
In this example, the service's interface, the single defined method, as well as the request message and its properties make use of CODE Framework attributes to document the service. (The same is true for the return type, but it is ommited for brevity in this example). Summary, Description, and External Documentation attributes are specifically designed to document the API's external interface.
The following attributes are supported to fine-tune the service/API definition:
[CODE.Framework.Services.Contracts.SummaryAttribute]- used to display a (typically short) summary of an API element[CODE.Framework.Services.Contracts.DescriptionAttribute]- used to display a more detailed description of an API element[System.ComponentModel.DescriptionAttribute]- this is the default description attribute defined by the .NET Framework. It can be used interchangably with the CODE FrameworkDescriptionAttribute[CODE.Framework.Services.Contracts.ExternalDocumentationAttribute]- used to provide a link to external documentation. Typically used on an interface[CODE.Framework.Services.Contracts.RestContentTypeAttribute]- used to indicate a non-standard content-type as the return value of a method. Typically, REST services always returnapplication/jsonas their content-type. However, it is possible to return other content from CODE Framework services, such asimage/png(usually by defining aFileResponsereturn type on the method). In that case, this attribute can be used to statically document such a content-type. Note that it is not necessary to use this attribute when the method returns JSON. Also, note that this attribute is only used for documentation purposes and does not change the behavior of the method. It is also only applicable when the service is hosted in a REST environment. All other hosting options and protocols will ignore this attribute completely.[CODE.Framework.Services.Contracts.FileContentAttribute]- this attribute can be applied to a property of typebyte[]on a data contract. It can be used to indicate that a byte-array is specifically used to transfer the contents of a file. (This information can be used by tools such as Swagger UI to change the way one can interact with the services, such as by displaying a file picker dialog)[System.ObsoleteAttribute]- an operation/method flagged as obsolete will be shown asdeprecatedin OpenAPI
Note: If you are unfamiliar with the use of attributes in C#/.NET, here is a crash-course: Attributes are bits of meta-information that can be applied to code elements, such as interfaces, classes, method, properties, and so on. They are applied with syntax as shown in the example above. Attributes typically have formal, long names, and are defined within a namespace. However, they are applied using short-hand syntax, therefore, the
System.ObsolteAttributeis applied to an element simply as[Obsolete](assuming there is ausing Systemsomewhere in hour code file or in your global using statements). The same is true for CODE Framework specific attributes. Therefore,CODE.Framework.Services.Contracts.SymmaryAttributeis applied like this:[Summary("This is my summary")]. Note that attributes in different namespaces can have identical names. For this reason, the above list uses the formal name and can thus differentiate betweenSystem.ComponentModel.DescriptionAttributeandCODE.Framework.Services.Contracts.DescriptionAttribute. Depending on your using statements, this could lead to a conflict, but you can always use the long name of an attribute (although you never use the “Attribute” suffix… this is just how the C# compiler works 😃 ):[System.ComponentModel.Description("Hello!")].
Swagger UI
One of the compelling features powered by the OpenAPI definition file, is the use of Swagger UI, a test-harness and documentation tool provided by the Swagger organization (the guys that originally defined the Swagger standard, before it was renamed given to the OpenAPI initiative and has). To use Swagger UI in your service/API, you have to add a third party package. We recommend the use of the Swashbuckle package from Nuget (Swashbuckle.AspNetCore), but you could use others, or you could manually enable Swagger UI support by adding the required components as described on https://swagger.io.
Assuming you added the Swashbuckle package, you can enable Swagger UI like this:
public void Configure(IApplicationBuilder app, IWebHostEnvironment env, ServiceHandlerConfiguration config)
{
    app.UseOpenApiHandler();

    // This enables Swagger UI
    app.UseSwaggerUI(options =>
    {
        options.SwaggerEndpoint("/openapi.json", "Service Description");
    });

    app.UseServiceHandler();
}
Note that the endpoint is configured to take advantage of CODE Framework's OpenAPI definition URL. Using this, Swagger UI now presents a UI for the service's documentation, which also acts as a test-bench that allows calling the services. This is therefore a good way to test and run your services without the need to create a client or run a manual tool such as Postman.
To see Swagger UI, launch your web app/host and navigate to /Swagger (such as http://localhost:5000/swagger).
Tip: For development, it may make sense to set this as your project's startup URL.
The following image is an example of what Swagger UI looks like:

Hosting Services in the Development Service Host
Development host hosting is supported in exactly the same way it has always been in CODE Framework. The development service host if a full-framework WinForms/WPF application that hosts the services in a way that is convenient for development. For more information, see Understanding CODE Framework Services.
Note that since the development host is a classic .NET Framework application, it does not understand dependencies .NET Standard and .NET Core projects do. Make sure you add all the NuGet packages and project references to this project manually. For instance, if you add a reference to the service implementation project, make sure to also add NuGet packages such as System.ServiceModel.Primitives and CODE.Framework.Services.Contracts manually.
Calling Services from .NET Core
Whenever both the client and the server are .NET (Core), CODE Framework provides a convenient way to call those services from the client in a strongly-typed fashion. This is also explained in Understanding Services. For completeness, it shall be mentioned here that this is also supported in .NET Core.
Note: .NET Core currently does not support WCF features. Therefore, we can currently only support calling REST services from .NET Core applications.
Calling services using ServiceClient works identical to all other flavors of .NET:
ServiceClient.Call<ICustomerService>(c =>
{
    var response = c.GetCustomers(new GetCustomersRequest());
    if (response.Success)
    {
        Console.WriteLine("Customers Retrieved:\r");
        foreach (var customer in response.CustomerList)
            Console.WriteLine($"Customer: {customer.Name} - Company: {customer.Company}");
    }
    else
    {
        Console.WriteLine($"Service call returned Success = false. Failure Information: {response.FailureInformation}\r");
    }
});
Side-note: Calling REST-based services in this fashion is dependent on CODE Framework's Transparent Proxy Generator feature, which is also available in .NET Core and can be used for many other interesting things.
Note that this kind of service calling depends on the system being configured properly. This can be done in various ways as described in our Service Configuration topic. Note however that in .NET Core, different config options may be desirable or required. For instance, if the above example was used in a command line application, one could either add a configuration file, or simply use CODE Framework's in-memory configuration features like so:
ConfigurationSettings.Sources["Memory"].Settings["RestServiceUrl:ICustomerService"] = "http://localhost:5000/api/customers";
ConfigurationSettings.Sources["Memory"].Settings["RestServiceUrl:IUserService"] = "http://localhost:5000/api/users";
Note: In CODE Framework for .NET Core,
ServiceClientassumes REST to be the default service call standard, so this does not have to be explicitly specified.
It is also possible to put configuration into an `appsettings.json' file. This is commonly done in ASP.NET Core applications, either because a service is called from an MVC-style web application, or because a service host itself wants to call another service. (Micro-Services are composable, thus one service can call another).
Here is an example of an appsettings.json config file:
{
  "Logging": {
    "LogLevel": {
      "Default": "Warning"
    }
  },
  "AllowedHosts": "*",
  "ApplicationSettings": {
    "RestServiceUrl": {
      "ICustomerService": "http://localhost:5008/api/customers",
      "IUserService": "http://localhost:5008/api/users"
    }
  }
}
To use this sort of configuration (which is dependency-injected in ASP.NET Core), add the following code to the Startup.cs file's constructor:
public Startup(IConfiguration configuration)
{
    Configuration = configuration;

    var appSettings = ApplicationSettingsJsonHelper.GetDictionaryFromSection(configuration);
    ConfigurationSettings.Sources.Insert(1, new DictionarySettings(appSettings));
}
Services and Dependency Injection
CODE Framework Services/APIs support dependency injection. Consider the following service implementation, as an example:
public class UserService : IUserService
{
    private readonly IUserProvider _userProvider;

    public UserService(IUserProvider userProvider) // Dependency injection example
    {
        _userProvider = userProvider;
    }

    public AuthenticateUserResponse AuthenticateUser(AuthenticateUserRequest request)
    {
        var response = new AuthenticateUserResponse();

        response.Id = Guid.NewGuid();
        response.Email = _userProvider.GetEmail();
        response.Firstname = _userProvider.GetFirstname();
        response.Lastname = _userProvider.GetLastname();

        // pass-through success and set Auth cookie in controller override
        return response;
    }
}
In this example, the UserService class defines a constructor that accepts a parameter of type IUserService. The value of this parameter is stored away in a _userService field, which is then used by the AuthenticateUser method to retrieve data. (This is a simple example, but one can easily imagine multiple such objects being provided to the constructor, which can then provide important functionality to the individual methods).
Note: This technique decouples the code within the service method from external dependencies. For instance, one could easily imagine this being used to decouple some logic from some kind of data access mechanism. Injecting such dependencies does not just improve the overall architecture, but it makes services more testable.
Dependency Injection and ASP.NET Core Hosts
This service example can now be hosted in a number of different ways. For instance, it can be hosted in ASP.NET Core as a RESTful service. In that case, the CODE Framework service hosting environment automatically uses the built-in ASP.NET Core Dependency Injection framework to not just instantiate and host the specified service, but it automatically instantiates all the parameter objects required by the service, based on registered dependencies.
Here is an example for ASP.NET Core startup code that defines such dependencies:
var builder = WebApplication.CreateBuilder(args);

// Enables hosting of CODE Framework services (either from the config file, or programmatically as shown here).
builder.Services.AddHostedServices(config => {});

// Add services to the dependency injection container to support our injection example.
builder.Services.AddScoped<IUserProvider, FakeUserProvider>();

// Ready to let ASP.NET build the app
var app = builder.Build();

// Enabled the CODE Framework service hosting environment
app.UseServiceHandler();

app.Run();
In this startup example, builder.Services.AddScoped() is used to add a “scoped dependency”. (For more specifics about how the ASP.NET Core DI framework works, see https://docs.microsoft.com/en-us/aspnet/core/fundamentals/dependency-injection?view=aspnetcore-6.0 for details). This tells the hosting environment, that every time a constructor parameter of type IUserProvider is required, an instance of type FakeUserProvider is to be used and automatically provided. Therefore, when the UserService is hosted in ASP.NET, the injected dependency will "just work".
Dependency Injection in In-Process Service Hosts
When services are hosted “in process”, Dependency Injection is also supported. However, in-process hosts do not have the same requirements as ASP.NET Core service hosts. Therefore, the ASP.NET Core DI framework is not available. Instead, the in-process hosting environment can itself act as a Dependency Injection Container ("IoC Container"). Therefore, the same UserService can be hosted in-process like this:
// Using the service garden as a local IoC container ("dependency injection")
ServiceGardenLocal.InjectDependency<IUserProvider, FakeUserProvider>();

// Hosting service implementations in-process
ServiceGardenLocal.AddServiceHost(typeof(UserService));

// Calling the in-process hosted service
ServiceClient.Call<IUserService>(s => {
    var response = s.AuthenticateUser(new AuthenticateUserRequest{});
});
In this example, ServiceGardenLocal.InjectDependency() is used to set up the dependency mapping, just like it was set up in the ASP.NET Core example. Therefore, the in-process hosted UserService works just like it does in the ASP.NET Core hosted scenario. No code changes are needed. Again, the service “just works”.
When using ServiceGardenLocal as a IoC Container, two different modes of dependency injection are supported:
ServiceGardenLocal.InjectTransientDependency<Interface, ConcreteType>()creates a dependency that instantiates (and re-instantiates) the concrete object whenever it is needed, no matter how many times it is needed. In in-process hosted services, instantiations happen sparsly. For instnace, theUserServiceinstance is likely only instantiates once (although this is not necessarily guaranteed). Therefore, theFakeUserProviderdependency is always only instantiated once. However, if a different service also used the same dependency, it would get its own instance ofFakeUserProvider. (Note:InjectTransientDependency()is the same asInhjectDependency()).ServiceGardenLocal.InjectSingletonDependency<Interface, ConcreteType>()creates a dependency that is treated as a singleton. No matter how many other types depend on the injected dependency, the concrete type will only ever be instantiated once and shared by all objects that have a dependency on it.
Note: Dependency Injection is a powerful and widely used feature. However, keep in mind that DI also comes at a cost in various ways. For one, a large service class that injects a lot of dependencies for the various methods to use, has to create those instances every time a service is required. Such a setup can use to a lot of unnecessary object creation and disposal. Another cost is that of readibility of the code. When looking at a piece of code that makes heavy use of dependency injection, it is often difficult to know what concrete types are used or what they do. This needs to be taken in consideration for productivity and training team members, and so on. We therefore recommend to only use DI where it provides a considerable benefit. For instance, it is very useful to inject objets that provide data access. On the other hand, does it really provide a great benefit to inject a logging object? Probably not. Especially if you use CODE Framework's logging framework, which is architected in a way that does not limited testability.