Using the Service Test Harness & Test Host
The CODE Framework Service Test Harness is a tool that allows to quickly test services of various kinds. To use the Test Harness, services have to be hosted in the Development Test Host (for more information on using the Development Test Host and developing services with CODE Framework in general, see Understanding Services).
In the Service Test Host, services use color-coded icons to make it easy and intuitive which protocol and standard is used to host a service. Blue is used for REST services (both, for the common JSON as well as XML formatted REST services). Orange is used for SOAP services (basic and WS). Green is used for binary TCP/IP services.
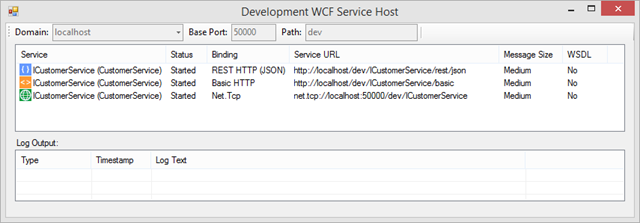
You can double-click a service in the development host, the Test Harness launches. The title of the Test Harness window shows the name of the implemented contract as well as the protocol and standard used for that particular service. Also, the entire window is color coded, just like the hosted services in the host window, making it easy to differentiate between different versions of the same service. (It is possible to launch multiple Test Harnesses for the same service based on different hosting versions. The color-coding makes it very easy to differentiate between these versions).
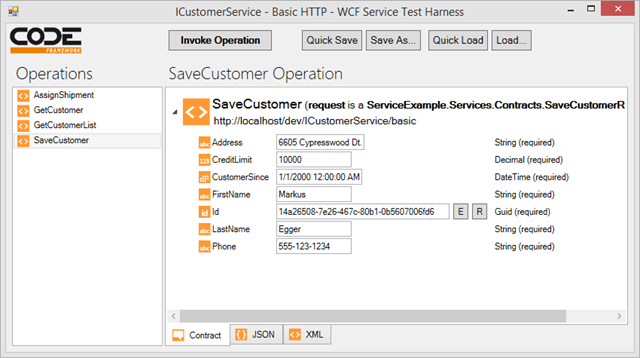
The Test Harness provides a list of Operations (Methods) the service exposes. Select one of those to see more details on the operation, including the input and output messages (“parameters”) for those operations. Using the Test Harness, developers can hand-craft input messages to be sent to the service. These messages can (and should) be complex objects with various types of members, ranging from simple things such as strings or boolean values, to complex members, such as binary fields or collections of sub-objects. The harness supports populating all these in a convenient tree UI.
Note that some fields allow for special features. For instance, GUID fields allow for the creation of an empty or a new random GUID. Collections allow adding sub-items. Binary fields can be populated by loading files. And so forth.
Once the developer has crafted the desired input message/parameter, the operation can be invoked (“called”) by hitting the Invoke button. (Note: It is also possible to hit CTRL-I or CTRL-ENTER to invoke the operation). The Test Harness invokes the operation using standard infrastructure. For instance, if a service is hosted as a WCF TCP/IP service, the Harness uses WCF's TCP/IP infrastructure in a free-threaded fashion to invoke the service. If the service is hosted using REST/JSON, a WebClient-based call is made. And so forth.
The result is then displayed in the result Message Visualizer.
There are a few extra things that should be mentioned about editing input messages:
In complex services, input messages can also be complex. During development and testing, it can be cumbersome having to re-enter the same message over and over. The Test Harness acknowledges and embraces this by letting developers save messages for future use. The simplest way to do so is by hitting the “Quick Save” button (or hitting CTRL-S) which saves the current message away to disk. Later, the same message can be loaded again using the "Quick Load" button (or CTRL-L), which retrieves and loads that message again. Similarly, messages can be explicitly saved and loaded using the Save and Load buttons, which lead to explicitly names messages (files).
Note that messages are saved on the hard-drive in JSON format. By default, they are put into a sub-folder (“Contracts”) of the folder the test host runs in (messages for each contract and operation are put into further sub-folders). This way, the messages become part of the folder structure of the solution. This can been seen as "polluting the folder structure", but that's fine, since the development host project is only a development artifact anyway that is not used for runtime deployment. Also, this leaves the option for the developer to check these files into the source control system if a sharing of standard messages for test purposes is desired.
Also note that the JSON format makes this operation somewhat fault-tolerant. It is easily possible to add more fields to the contract or change various other details, without having to abandon previous versions. This is very convenient during development.
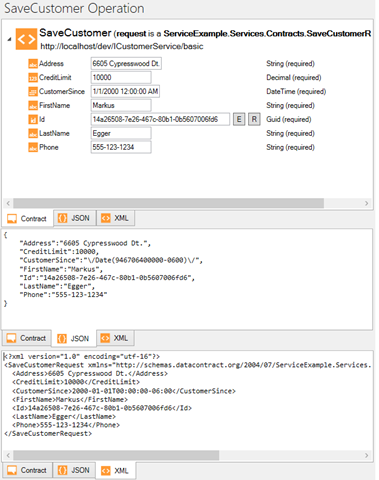
A further point of interest is that messages can be edited in various ways. The tree UI is the default, but one can also switch into JSON and XML representations of the same message. This is not just a read-only version (although it is convenient to always have easy access to XML and JSON versions of a message that was hand-crafted in the tree… for instance, this feature is very useful for JavaScript developers), but this is a read/write view. Both XML and JSON messages can be modified. Then, simply click “Invoke” to call the service with the input message based on XML and JSON. All services can be modified in any standard. For instance, a binary TCP/IP service can have its input message edited in JSON. A JSON/REST service can have its input message edited in XML. And so on. The input editor is simply a UI to edit an in-memory message that is then passed on to the service appropriately, independent of the version used to edit it.
Another details that is worth noting is that in addition to the name of the operation and the utilized contracts, this window also shows the URI used to access the service. This includes the protocol (such as HTTP or net.tcp) as well as the HTTP Verb for REST services (such as GET, PUT, POST,…). Furthermore, in REST scenarios, the URL dynamically updates if needed. For instance, a SearchCustomer service called over REST (GET Verb) may require passing the search parameter as part of the URL, which is immediately reflected in the Test Harness UI. This also makes it easier to know how to call the services in other scenarios (such as when the same service is called from JavaScript in a Web Browser scenario).
Related Topic: Detailed Server Exception Information
During development, it is often useful to see additional exception detail raised by the server-side code (which would not be desirable to pass to the client in production environments, as this would provide exactly the kind of information hackers need to break into systems). This can be enabled in the development service host using standard WCF configuraiton options. However, since this is such as common scenario, CODE Framework provides a shortcut (this is usually found in Program.cs of the development service host project:
var host = new TestServiceHost();
host.EnableDetailedServiceFaultInformation(); // Set *before* hosting any services

host.AddServiceHostNetTcp(...); // And so on...