Message Boxes in WPF MVVM/MVC Applications
CODE Framework supports a native way to do message boxes. And that is a lot cooler than it sounds 😃
Here are some of the benefits/needs:
- Message boxes needs to be completely stylable
- They should work the same in all kinds of environments (the syntax on Windows Phone should be the same as in WPF for instance to enable code reuse and know-how reuse)
- They should also work the same no matter whether message boxes are popup modal dialogs, or whether message boxes are floating elements (like in Metro or Silverlight).
- Message boxes should support a lot more than default buttons and a bit of text. Message boxes need to show any button I want and I want to show additional UI elements such as textboxes and radio buttons
- Whenever a view model calls for a message box, that should not break testability.
Message Box Fundamentals
Fundamentally, CODE Framework message boxes are quite simple, as they provide all the standard features available in typical .NET message box scenarios (such as in WPF or WinForms). The main difference between CODE Framework message boxes and other .NET environments is that in CODE Framework, for consistency, flexibility, and added power, message box calls are routed through controllers. The basic idea is simple: The Controller class now has a Message() method that takes parameters that are practically identical to the default MessageBox.Show() stuff that is available in various .NET namespaces.
So you can simply do the following:
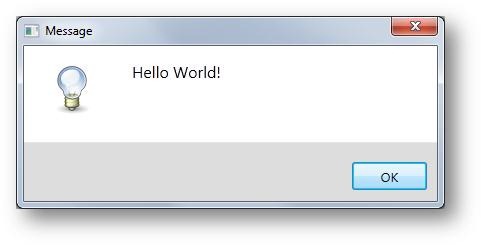
Controller.Message("Hello World!");
The output of this will depend entirely on your skin (and you can skin it further if you want). For instance, using our Windows 95 skin (Battleship), the above line creates this message:
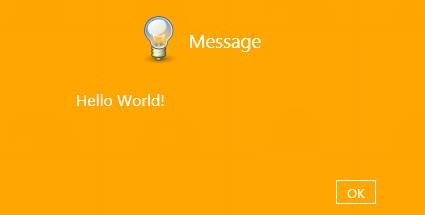
And if you were to run our Metro skin (with further customized colors in this example), you would see something like this:
Note: Calling Controller.Message() is just a shortcut for creating an action on a controller that returns a MessageBoxResult. You can do that as well (see below), but this shortcut is of course very convenient in many cases.
Of course you can pass a variety of parameters to get different stuff to show up. Like this example for instance:
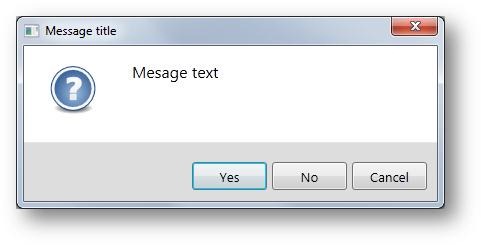
Controller.Message("Hello World!", "Message title",
    MessageBoxButtons.YesNoCancel, MessageBoxImages.Question);
This results in the following (Win95 skin):
Here’s the Metro version:

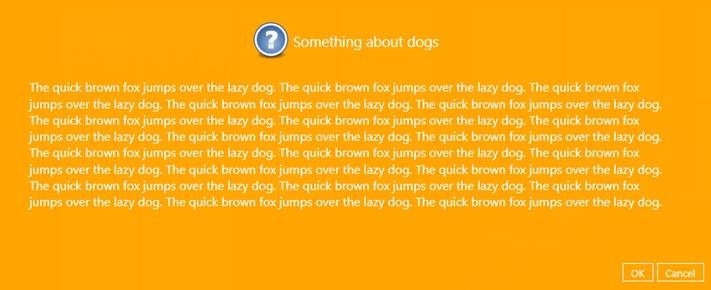
Or a slightly longer text version in Metro:
And the same in Win95:
Getting Results
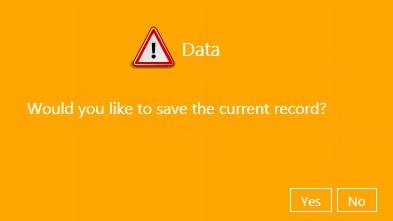
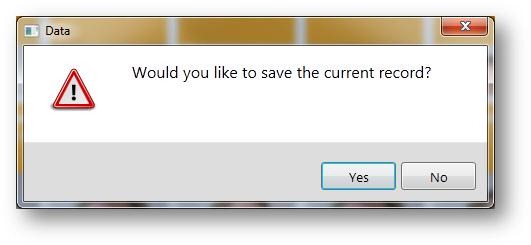
There are a few additional things to point out: Modern message boxes really have a few issues, especially when they are styled, or when they run in environments such as Windows 8 Metro: For one, they may not be modal and may not block execution. So you can’t just wait for the message box to return a result based on the button that was clicked. We have tried to solve this problem and make things as easy as possible for you to give you an easy way to handle this, by allowing you to pass the code you want to execute after a button was clicked. Example: Let’s say in the code of your view model, you want to pop up a message and ask the user if they want to save. If they click yes, you want to call the Save() method. You could do this like so:
Controller.Message("Would you like to save the current record?",
                    "Data",
                    icon: MessageBoxImages.Warning,
                    buttons: MessageBoxButtons.YesNo,
                    onComplete: r =>
                    {
                        if (r.ModelMessageBox.Result == MessageBoxResults.Yes)
                            Console.WriteLine("Saving...");
                    });
Note the onComplete code (here just echoing something to the Console, but imagine it did a this.Save()) which is called whenever the message box is closed one way or another. So it becomes a simple way to run code that works in absolutely every scenario (including testing… in test scenarios no actual UI would be displayed).
This creates these message boxes for Metro and Win95 theme respectively:
Custom Message Boxes
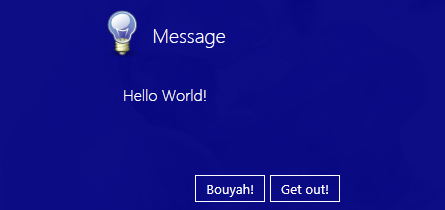
Here’s a little secret: Message boxes in CODE Framework are just a standardized version of views and view models. In other words: When you make a call to Controller.Message(), it creates a MessageBoxViewModel and a standard view and shows them like any other top level view (popup) view. And the best part: The default for that is just that: A default. And you can mess with that at your heart’s content. You can subclass that view model, and you can do really funky message boxes by creating your own views.
The following example shows a message box that uses 2 custom view actions rather than the default buttons:
var myActions = new List<IViewAction>
{
    new MessageBoxViewAction("Bouyah!", execute: (a2, o2) =>
    {
        var action1 = a2 as MessageBoxViewAction;
        if (action1 != null)
        {
            // Do something here...
            action1.Model.Result = MessageBoxResults.OK;
            Controller.CloseViewForModel(action1.Model);
        }
    }),
    new MessageBoxViewAction("Get out!", execute: (a3, o3) =>
    {
        var action2 = a3 as MessageBoxViewAction;
        if (action2 != null)
        {
            action2.Model.Result = MessageBoxResults.Cancel;
            Controller.CloseViewForModel(action2.Model);
        }
    })
};
Controller.Message("Hello World!", actions: myActions);
Note that these 2 custom actions are based on the MessageBoxViewAction class. This is not mandatory, but if you do, then the first parameter that gets passed to the execute method is a reference to that specific class, which has a Model property that is typed as a MessageBoxViewModel, which provides easy and convenient access to the model and important properties such as the Result property, which is generally used to indicate the overall result produced by the message box. (The model object could also be subclassed, which could provide additional information… see below).
Here is the result of this particular message box shown in Metro style:
Note: It is also possible to use the ShortcutKey and ShortcutModifiers properties on the actions to assign hotkeys to actions.
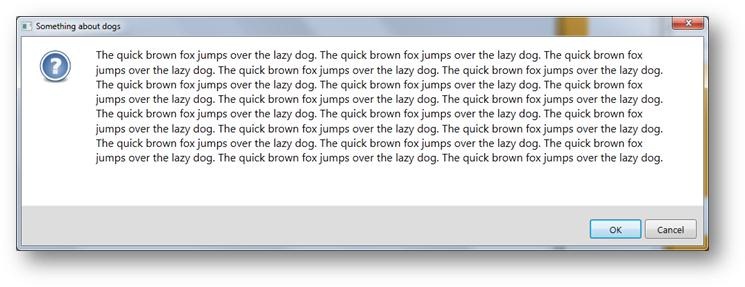
The next sample is another simple example that contains a red label and also a textbox. It also uses 2 completely non-standard button captions, by adding to view actions that get automatically shown as buttons (our message boxes can have any number of buttons/actions). Here is the Battleship (Windows 95 version):
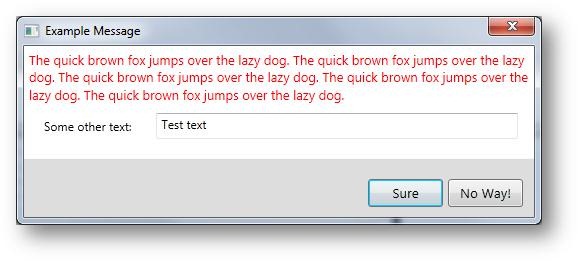
And here is the Metro version:

This uses a custom view model as well as a custom view. The view model defines the text as well as an additional property for the textbox. It also defines 2 custom view actions. Here is the code for that view model:
public class Message3ViewModel : MessageBoxViewModel
{
    public Message3ViewModel()
    {
        Actions.Add(new ViewAction("Sure", execute: (a, o) =>
        {
            Result = MessageBoxResults.OK;
            Controller.CloseViewForModel(this);
        }) {IsDefault = true});
        Actions.Add(new ViewAction("No Way!", execute: (a, o) =>
        {
            Result = MessageBoxResults.Cancel;
            Controller.CloseViewForModel(this);
        }) {IsCancel = true});

        SomeInputText = "Test text";
        Text = "The quick brown fox jumps over the lazy dog. ".Replicate(5);
    }

    public string SomeInputText { get; set; }
}
In addition, the following view is defined:
<mvvm:View xmlns="http://schemas.microsoft.com/winfx/2006/xaml/presentation"
           xmlns:mvvm="clr-namespace:CODE.Framework.Wpf.Mvvm;assembly=CODE.Framework.Wpf.Mvvm"
           xmlns:Controls="clr-namespace:CODE.Framework.Wpf.Controls;assembly=CODE.Framework.Wpf"
           Title="Example Message">
    <Grid Controls:GridEx.RowHeights="Auto,Auto"
          Controls:GridEx.ColumnWidths="Auto,*"
          MaxWidth="500">
        <TextBlock Foreground="Red" Grid.ColumnSpan="2"
                   Text="{Binding Text}"
                   TextWrapping="Wrap"
                   FontSize="13" />
        <Label Margin="10"
               Grid.Row="1">Some other text: </Label>
        <TextBox Margin="10" Grid.Row="1"
                 Grid.Column="1"
                 Text="{Binding SomeInputText}" />
    </Grid>
</mvvm:View>
Of course views need to be placed in a location where the view definition can be found. For instance, if this was a message box shown as part of interactions related to a Customer controller, it may be put in the \Views\Customer folder. In this example, the file is named “Message3.xaml”.
The message box can now be triggered in the following fashion:
Controller.Message("Hello World!",
                   model: new Message3ViewModel(),
                   viewName: "Message3",
                   controllerType: typeof(CustomerController)));
There are a few interesting aspects here. The view model is passed as the model parameter. The name of the view (without the “.xaml” extension) is passed as the viewName parameter. Note that since we are simply calling the method on the standard Controller class, there would be no way for the controller to know that the view goes with the Customer controller and is thus to be found in the \Views\Customers folder. For that reason, we also have to pass the controllerType parameter, which provides this information. (Note: In the special case of having the view stored in the \Views\Shared folder, the controllerType parameter is not needed).
Note that it is also possible to wrap all of this into a standard method inside the controller. The following method could have been added to the CustomerController method and then be called like all other controller actions to create the same message box:
public ActionResult Message3()
{
    return MessageBox(new Message3ViewModel());
}
This is a “cleaner” approach and may add testability. Ultimately, the prior version above is functionally almost identical to the explicit declaration of a view action.
Unit Testing Code with Message Boxes
Often, code you may want to unit test (especially view models) may have calls to message boxes. Message boxes normally launch user interfaces, which is not suitable for unit testing. To alleviate this problem, the Controller class allows pre-loading message box results for subsequent message box calls. If that is done, the queued results will be used rather than displaying an interface.
Consider the previous example of the view model. It asked the user to enter example text and then click a button (view action). We can easily mock this interaction for a unit test scenario by queuing a message box result in the following fashion:
Controller.QueueMessageBoxResult(MessageBoxResults.OK,
    m =>
    {
        var vm = m as Message3ViewModel;
        if (vm != null)
            vm.SomeInputText = "Hello World!";
    });
In this example, two interesting tasks are preformed: 1) the message box result is set to ”OK”, which simulates the user clicking the button that represented OK. 2) This example passes some code as the second (optional) parameter, which allows us to perform certain actions during the simulation. In this case, the “SomeInputText” property is set to “Hello World”. As a result, if we now make a call to Controller.Message(), the message will not be displayed on the screen but instead, it will use these simulated results.
Note that it is possible to queue as many items as are desired, since multiple message boxes may be executed within a single call to the object that is being tested. Consider the following example, which queues two results:
Controller.QueueMessageBoxResult(MessageBoxResults.OK,
    m =>
    {
        var vm = m as Message3ViewModel;
        if (vm != null)
            vm.SomeInputText = "Hello World!";
    });
Controller.QueueMessageBoxResult(MessageBoxResults.Cancel);