Standard Views and View Models
In prior articles, I have shown how to create WPF-based applications using the CODE Framework and the MVVM and MVC patterns. This enabled developers to create quality applications quickly and in a fashion that can easily be understood by developers of all skill levels. In those articles I showed how to use view-models and views to create UIs. In this article, I am going to take this concept further by showing you how you do not even have to create new views and view-models, but instead can use the ones CODE Framework defines for you out of the box.
When developing applications using the MVVM pattern in any development environment, the basic idea remains the same: The actual “view” of the user interface (the visible part, such as controls and windows, and so forth) is developed separately from the "view-model", which is the part that contains the logic and the data for the view. The two parts bound together by some kind of coupling mechanism. There are a number of reasons why this is appealing, one of which being a simplification of the development task.
Not all MVVM setups necessarily exhibit this particular attribute, but as the Chief Software Architect in charge of the architecture used by CODE Framework, I like to believe that we have achieved this goal. We quite frequently hear from developers who are going out of their way to thank us for "bringing sanity back to WPF development” by making MVVM as simple as it should be. (Note that CODE Framework isn’t just a WPF technology and you can use the concepts in the framework and described in this series of articles in a number of other environments such as Windows Phone and WinRT).
But there is more to this story! Not only do the CODE Framework UI development features aim to enable developers to create high-quality and highly reusable UIs in an easy and straightforward fashion, but the CODE Framework also aims to create ready-to-go components out of the box. Providing useful UI components and features as a standard part of the framework is a pattern we repeat over and over in numerous ways. In previous articles we have explored standard themes, standard controls, and quite a few other standard elements. This time around, we are going to venture into the world of standard views and standard view-models.
Introducing Standard Views and View-Models
When creating an MVVM application, the first step developers usually take is the creation of a view and a view-model that fits one’s needs. For instance, when creating a customer edit UI, one could create a view that shows textboxes and labels and a whole set of other controls that for the basis of the edit experience. In addition, the view-model defines the logical parts and the data that goes with that. Each UI control has a matching property in the view model to bind to (for instance, the first-name textbox binds to a FirstName property on the view-model, the company textbox to the CompanyName property, and so forth…). The view-model also contains logic that goes along with editing a customer. Perhaps a rule is that a customer always has to provide either a last name or a company name to be valid, and the view-model can enforce that rule in one way or another.
In short: The view and the view-model created for customer editing are highly customized and specific to the scenario at hand, which is editing customer information. To implement such a scenario, developers always have to craft a custom user interface and custom logic. However, not all scenarios are like that. Consider the need to display a searchable list of customers (practically all edit UIs also have the need to search the entity they edit and provide a list). In that case, the view needs to expose search UI (perhaps a textbox and a Search button) and it also needs to display a list of customers as the search results. This list shows data such as the customer name or addresses and more. At first glance, this appears just as unique as editing a customer, but is it really?
For the customer search and list scenario, I would argue that it isn’t very unique. Admittedly, the list shows some unique data such as first name and last name and so on, but looking at the scenario from a slightly different angle, we need a list that displays several data elements (all of which can arguably be expressed as text) and ideally do so in a fashion that is consistent with the rest of our application. If we were to think outside the box for a moment (or should I say “outside our rectangular data structures”?), we could also look at this scenario as displaying a list of items with several text fields and perhaps an image for the customer. Looking at it from this point of view, at least a very considerable portion of our view-model (the list portion) becomes fairly mundane and reusable. We simply need a way to implement the ability to display several text elements and we can then reuse the same sort of setup across large parts of our applications. And this is exactly what CODE Framework standard views and view-models do!
It is also interesting that once you start thinking along the lines of these ideas, you realize that even our customer edit scenario isn’t quite as unique as we may have thought at first. For instance, the customer edit UI may call for a list of email addresses or a list of phone numbers. Do those really require custom setups? I would argue that there are at least parts that are fairly generic. I can imagine displaying a list of phone numbers where each item shows a phone icon and a text element displaying the phone number. Again, we could use a standard setup to express that part of the application.
At this point you may say “OK, I can see how some parts of my application can benefit from this, but I still have a lot of custom aspects”, and that is fine! A key design idea of CODE Framework custom views and view-models is to provide ready-to-go features where needed, but allow developers to easily supplement those features with their own ideas.
A Customer Example
To illustrate these fundamental ideas, let’s create a simple customer search form. To start out, create the same customer search example we have used in prior articles (see Understanding WPF Development with MVVM/MVC Components). Create a new view called Search and a view-model called SearchViewModel. (If you do not have CODE Framework installed, see sidebar on how to download the framework). The new view-model needs to support the search UI as well as list UI exposed by the view, as well as the code that actually searches for customers. Conceptually, the following simple view-model fits the bill:
public class CustomerViewModel : ViewModel
{
    public string SearchString { get; set; }
    public ObservableCollection<CustomerInfo> Customers { get; set; }
}
This provides a text property for the search string, which we can bind to a textbox in the UI allowing the user to enter the desired search term. (Again, if you are unclear about these concepts, I encourage you to read my earlier articles in this series). Once the user enters the search term, the collection of customers is with appropriate results retrieved from a service or a database. In this example, I am assuming that there is a CustomerInfo class which will presumably have properties such as FirstName, LastName, CompanyName, and so forth. Since we do not have this class yet, our next step would be to go out and create this class and add a whole bunch of properties to it, like so:
public class CustomerInfo : ViewModel
{
    private string _firstName;
    public string FirstName
    {
        get { return _firstName; }
        set
        {
            _firstName = value;
            NotifyChanged("FirstName");
        }
    }

    // Repeat the above property definition for each needed property
}
This is a relatively simple task, but it is also quite tedious and sometimes even error prone (the above example only shows a single property, but a real-world implementation would have many more). This class doesn’t do anything particularly interesting. It’s just a verbose way to express the structure of the data we expect in the list of customers. Once we have this class all defined, we can use it to populate our collection with search results. Here’s a simple that shows the most important elements needed to accomplish this task:
private void Search()
{
    // TODO: Search based on the text in SearchString

    Customers.Clear();

    foreach (var result in results)
    {
        Customers.Add(new CustomerInfo
        {
            FirstName = result.FirstName,
            LastName = result.LastName,
            CompanyName = result.Company
            // More fields to go here…
        });
    }
}
We now presumably have a list of search results represented by our CustomerInfo class and this works fine. But it also is quite a bit of work that really doesn’t provide a whole lot of benefit in this scenario. This is where standard view-models come into play. Instead of creating a brand new class for customer information, we can use our standardized model like so:
public class CustomerViewModel2 : ViewModel
{
    public string SearchString { get; set; }
    public ObservableCollection<StandardViewModel> Customers { get; set; }
}
Instead of a special CustomerInfo class, we now simply use the StandardViewModel class provided by the CODE Framework. The main difference here is that the StandardViewModel class is not aware of customer-specific information such as “first name” or "company". Instead, the StandardViewModel class simply calls these things Text1, Text2, and so forth. With this in mind, we can now re-write our search method:
private void Search()
{
    // TODO: Search based on the text in SearchString

    Customers.Clear();
    foreach (var result in results)
    {
        Customers.Add(new StandardViewModel
        {
            Text1 = result.FirstName + " " +
                    result.LastName,
            Text2 = result.Company
        });
    }
}
At this point, some developers may point out that using properties such as Text1 instead of FirstName makes them feel a bit dirty. It simply goes against the believes most passionate developers have. “The FirstName data element should be named appropriately” they say. And that is an interesting point. It is a bit of a trade-off. However, if this small and functionally completely irrelevant trade-off can provide massive benefits, then it is probably a trade-off worth making. (Plus, we will talk about overcoming this stylistic problem below).
The StandardViewModel (which is simply an implementation of the IStandardViewModel interface, which represents the true basis of standard view-models) implements a number of different properties. It provides ten different text properties (Text1 through Text10), two string identifier properties (Identifier1 and Identifier2) which are generally used to keep track of data that is not displayed to the user such as keys, two numeric properties (Number1 and Number2), a tool-tip property (ToolTipText), five properties for images (Image1 through Image5) which are expressed as brushes and can be used to display all kinds of images such as photos, and two logo properties (Logo1 and Logo2) which are also brushes and can be used for image display as well. (The keen observer may notice that this also happens to map quite closely to data structures used for standard notifications and tiles and similar things in Windows8/WinRT, and that keen observer would be right. This is no coincidence as we aim to keep these features compatible across different scenarios.)
Some of the features provided by the standard view-model architecture are quite interesting. For instance, we just gained a relatively simple approach for attaching images or graphics to our customers. If our search results included a customer photo for instance, we could have simply attached that to the Image1 property. Similarly, we could have used one of the standard icon/graphics resources that ship with CODE Framework (or art we created on our own for that matter) and attached those assets as images. If you have art assets stored as standard XAML resources, you could retrieve those resources from the resource system and attach them. If this statement just made you scratch your head, fret not! The StandardViewModel class makes that task easy as well by providing a GetBrushFromResource() method. Here’s an updated version of the search method that takes advantage of this capability:
private void Search()
{
    // TODO: Search based on the text in SearchString

    Customers.Clear();
    foreach (var result in results)
    {
        var customer = new StandardViewModel
        {
            Text1 = result.FirstName + " " + result.LastName,
            Text2 = result.Company
        });
        customer.Image1 = customer.GetBrushFromResource("CODE.Framework-Icon-ContactInfo");
        Customers.Add(customer);
    }
}
Note that this uses one of the standard icons provided by CODE Framework. Each CODE Framework theme supports a standardized list of graphical resources. The icon specified in this example will be different for an app that runs the Metro theme vs. an app that runs a Windows 95 theme, and so forth. Each theme is responsible for producing the requested icon in a style that is consistent with the overall theme. (The exact list of available standard icons can be found here).
Displaying Customers
At this point, we were able to reduce the definition of the view-model structure to almost no code and we were able to keep the search method at about the same level of complexity as before (although we gained some substantial abilities such as loading icons). All that is left to do now is display these customers in the user interface. We can do so by defining a ListBox in our view and creating a template for each item in the list. Here’s a first attempt at this:
<ListBox ItemsSource="{Binding Customers}">
    <ListBox.ItemTemplate>
        <DataTemplate>
            <StackPanel>
                <Label Content="{Binding Text1"} />
                <Label Content="{Binding Text2"} />
            </StackPanel>
        </DataTemplate>
    </ListBox.ItemTemplate>
</ListBox>
This works perfectly fine, but it has a few warts. One of them is that this does not provide a professional look we can ship in a modern application. A significant amount of work should now be allocated to making this simple list look good. (Which is also a task most developers aren’t good at, nor are developers passionate about this, generally speaking). A further problem is that this hard-codes a specific look. We should really create different templates for different themes. Metro looks different from Windows 95, and so forth. Even if our application only has a single theme/look, we may want to update the look of this template over time to keep the app fresh and maintainable. The above approach does not support this however.
A better approach is to use a standard template that goes along with our standard view-model. To do so, we can simply do something like this:
<ListBox ItemsSource="{Binding Customers}" ItemTemplate="{DynamicResource CODE.Framework-StandardTemplate-DataAndImage02}" />
And that’s it! The template referenced in this example is a standard template provided by each theme supported in CODE Framework. Thus, what that template looks like is dependent on the theme chosen. Figure 1 shows this particular template as part of a Metro application. Figure 2 shows the same template in a Windows 95 app, and Figure 3 shows it in the custom Vapor theme I created as an example in my CODE Framework theming article (see last issue of CODE Magazine). Figures 4 and 5 show user interfaces that use the same approach but with different standard templates chosen.
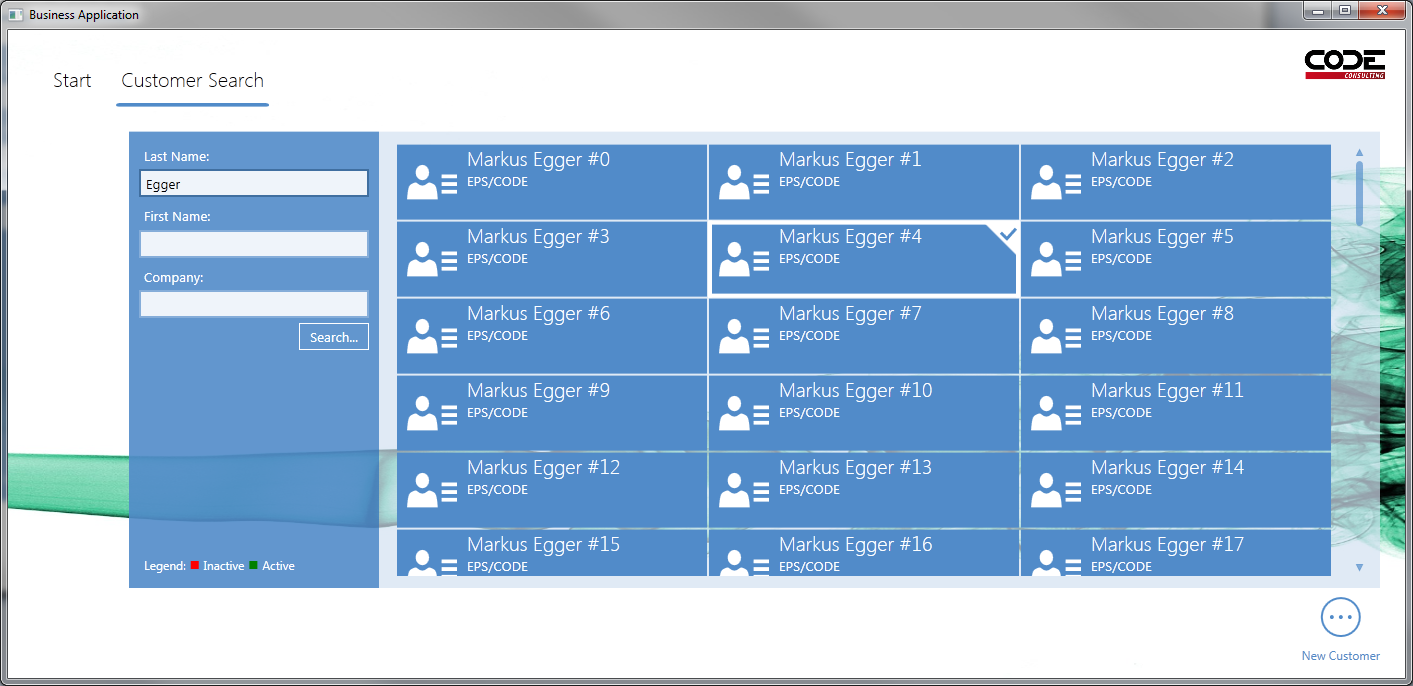
Figure 1: A Metro application uses the DataAndImage02 standard view template to display customers with icons.
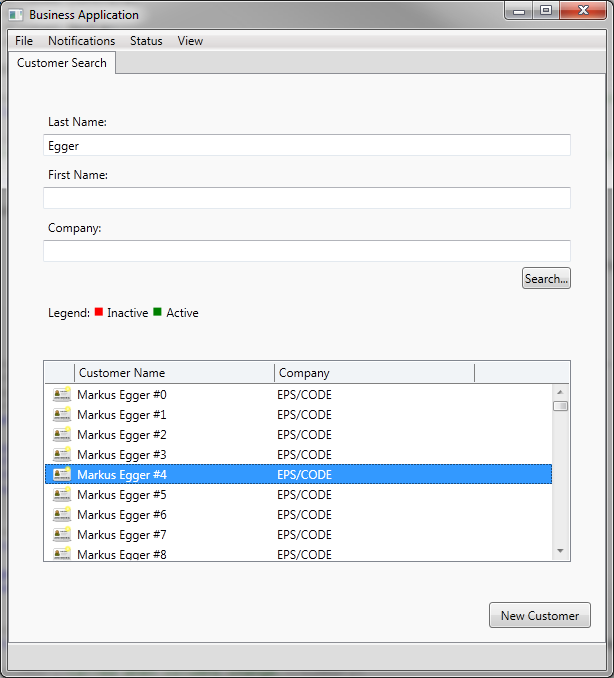
Figure 2: The same view as in Figure 1 but displayed using the Battleship (Windows 95) theme. Note that the data template for each customer smartly changed to create a multi-column grid display.
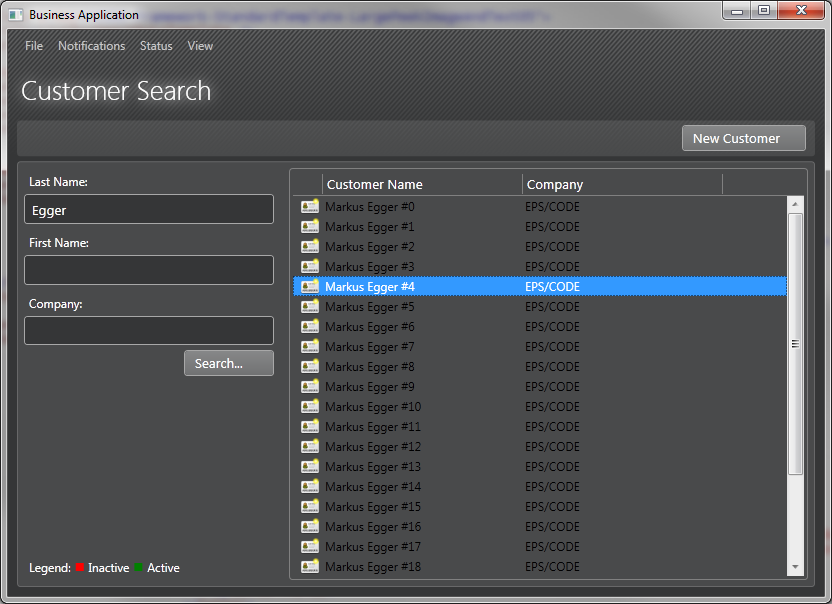
Figure 3: The same view as in the prior figures but using the custom Vapor theme created in a prior article in this series.
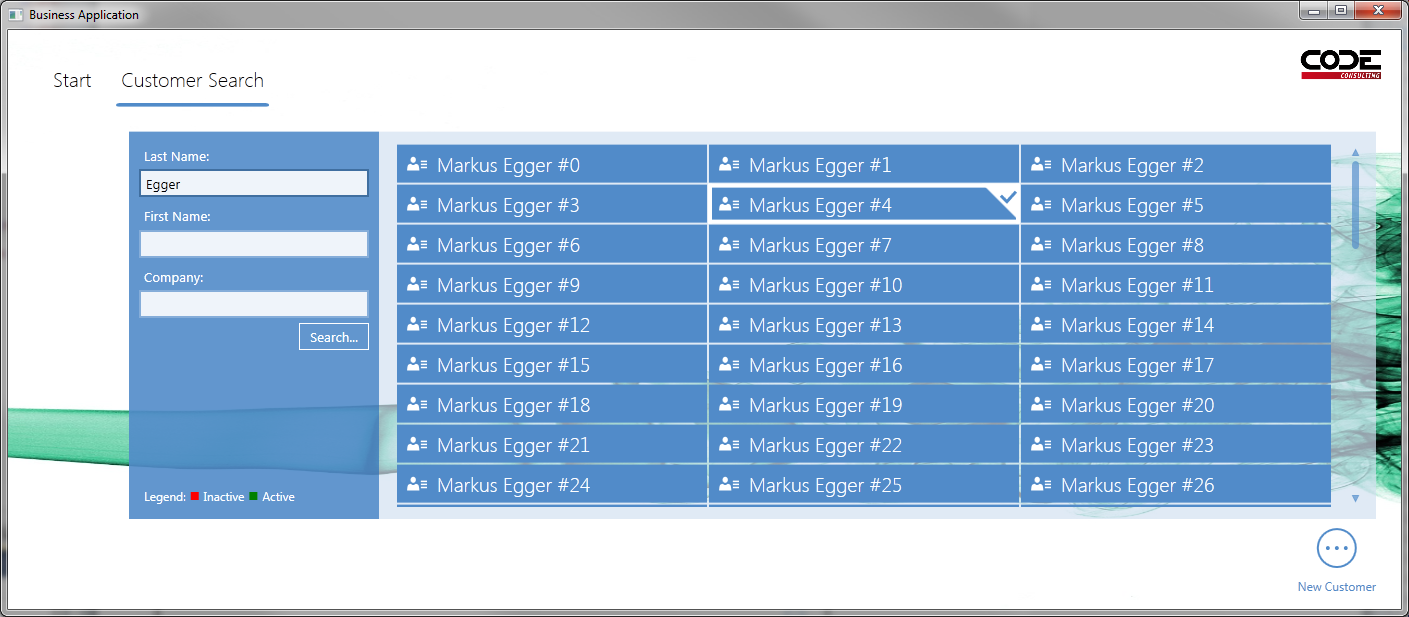
Figure 4: The same form as in Figure 1 but with the DataSmall02 standard view template applied to provide a more compact view.
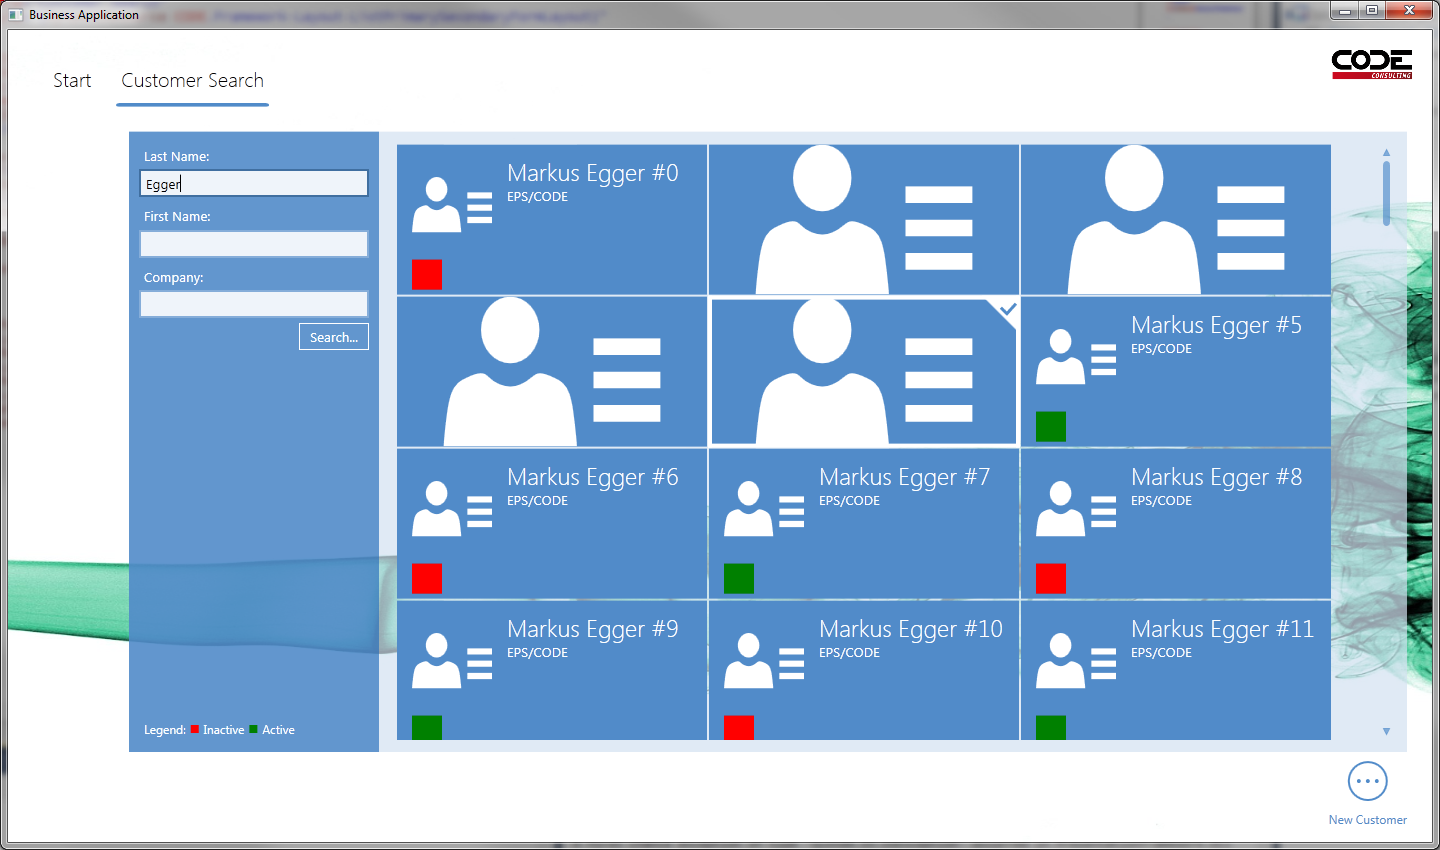
Figure 5: The same UI as in Figures 1 and 4, except with the LargePeekImageAndText05 template applied, which includes an automated “live tile” style animation that is semi-randomized across the different tiles.
The particular templates I picked for this example are just a few out of a large list of supported templates. I picked a few semi-randomly in an effort to find ones that were to my liking for a customer list. Note that the list of supported standard templates is quite large (53 as I am writing this article) and it is constantly growing. Figure 6 provides an additional small sampling of Metro templates
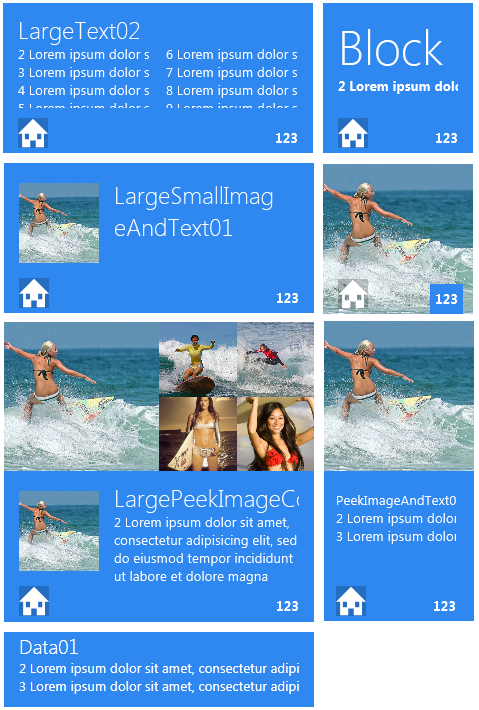
Figure 6: A random sampling of some standard Metro data templates.
When you look at the list of provided templates, you will realize that some of these templates are quite elaborate. For instance, the Metro theme provides a template for each and every standard live-tile format provided by Windows 8 plus quite a few additional ones. This includes all the animations one would see in Windows 8. If developers had to manually create templates individually for each and every list, the same level of polish simply would not be feasible as the required effort would be monumental. Since we took care of that part however, one can simply apply these standard templates and achieve a professional appearance with little effort. This appearance is also conforming to standards defined by environments such as Windows 8.
Note that templates of the same name will look completely different in other themes. What’s a live tile in Metro may be a multi-column grid in Windows 95 and look just like developers would typically expect lists of data to look in older style applications. The ability to turn lists into data grids is another intrinsic capability CODE Framework provides (a detailed explanation of how to turn listboxes into data grids may be the topic for a different article in this series). Developers can be quite specific how they want column-based layouts to work, or they can let the templates try to figure it out on their own. I was able to achieve the results shown in Figures 2 and 3 by defining specific columns. I did so by adding a listbox style to the resource dictionary specific to the theme I wanted the column-base list to appear in. Here is an example of such as style:
<Style x:Key="Customer-List"
      TargetType="ListBox"
       BasedOn="{StaticResource {x:Type ListBox}}">
  <Setter Property="Controls:ListEx.Columns">
    <Setter.Value>
      <Controls:ListColumnsCollection>
        <Controls:ListColumn Width="30" IsResizable="False"
          BindingPath="Image1" />
        <Controls:ListColumn Width="200" IsResizable="True"
           BindingPath="Text1" Header="Customer Name" />
        <Controls:ListColumn Width="200" IsResizable="True"
           BindingPath="Text2" Header="Company" />
      </Controls:ListColumnsCollection>
    </Setter.Value>
  </Setter>
</Style>
Standard view templates interested in displaying columns pick up on this abstract definition of columns and arrange themselves accordingly (with associated behavior, such as column resizing). Note however that I would have been able to achieve a very similar display even without defining custom columns at all, because the chosen style would have defaulted to an image and two text columns, since that is the set of information displayed in the Metro style as well (you can generally expect the same fields to show up in templates of different themes). However, defining the columns myself provides the ability to fine-tune details such as the exact column width and whether or not the column should be resizable. For more information on the exact implementation of this example, download the example code associated with this article.
All of these features associated with standard views and standard view-models make for a very powerful system. Using this approach, it becomes trivial for us to create these types of user interfaces. The templates provided by the CODE Framework enable us to write applications that look good and often provide extra features without having to do any extra work. We can also rely on the standard templates being supported in each theme, and those templates will then look appropriate for each and every theme we decide to support now or in the future. Plus, if we use this mechanism across our application, we will have a very consistent look across the board. The application also becomes more reusable and maintainable over time. All very positive attributes for a modern application!
Note that I said we can rely on templates being there for every theme. Let me clarify this point a little bit: Whenever you use a standard template name, you can rely on the framework providing some kind of template for you. This doesn’t necessarily mean that each theme has to implement exactly the same number of templates. For instance, Metro sometimes has 2 almost identical templates, where one provides an animation while the other is the counterpart without animations. This may not make sense using the Battleship (Windows 95) theme. In that case, both of these templates may in fact look exactly the same in that theme. From a developer’s point of view however, this does not matter. What matters is that the app will keep working using the Battleship theme and it will display a data template that makes sense.
More About View-Models
We have now seen how to directly use the standard-view model and display a list using a standard view template to show information. For many scenarios, this approach is completely sufficient. However, this is just the beginning and we can take this a step further. For instance, we may already have an existing CustomerInfo class and would simply want to take advantage of the standard templates but not the view-model. Is this possible?
Well, as you can imagine, I wouldn’t bring this up if it wasn’t supported. As it turns out, view-templates are dynamically bound to the view-models behind the scenes. What this means is that templates really do not care whether the view-model objects implement IStandardViewModel or not. All they care about is that the view-model exposes properties such as Text1 and Text2 and so forth. We could easily do this in custom view-models. For instance, we could return to our initial version of the customer view-model and add an implementation of Text1 and Text2:
public class CustomerInfo : ViewModel
{
    private string _firstName;
    public string FirstName
    {
        get { return _firstName; }
        set
        {
            _firstName = value;
            NotifyChanged("FirstName");
        }
    }

    // Repeat the above property definition for each needed property

    public string Text1
    {
        get { return FirstName + " " + LastName; }
    }

    public string Text2
    {
        get { return CompanyName; }
    }
}
Voila! You can now use a standard item template to display this type of customer in a list. For those developers who would like to keep their code “clean”, this may provide a more satisfying setup. It is also a great option for scenarios where you may deal with view-models that already exist, or scenarios where you simply may have to add significant new functionality and logic (the concatenation of the first and last name in the above example provides a simple example of such a need) yet want to stick with the overall standardized approach.
There are several other options you can use to achieve similar results. It is possible to implement IStandardViewModel on your custom object. This guarantees that you correctly implement every single property that interface specifies and can thus support all the different templates. (Note: The example above only supports templates that display only 2 text fields correctly. If you applied a template that attempted to show a 3rd text field, it would fail to do so, but it would attempt to handle the situation as best as possible by showing an empty string). Implementing the interface is not strictly required, but some may consider it good form. Personally, I only do it in complex interfaces where I use most of the properties. Yes, I do still consider it good form to implement an interface, but at the same time, I realize how much work it is to do so and how little benefit we derive in this particular scenario.
Yet another possible option is to inherit from StandardViewModel. Using this approach, you can add additional functionality. It is also possible to override the properties on the model (all standard properties are flagged as “virtual” and can thus be overridden). This allows for quick implementation of a standard view model (since you do not have to type out each and every property) yet still have guaranteed compatibility. The ability to override individual properties enables some interesting scenarios. For instance, you could override the Image1 property so it attempt to load a customer photo from a database or service and only display the icon whenever that photo is not available.
More About Templates
The template part of the system also warrants a second look. The fundamental idea is relatively simple: Whenever you refer to a data template by resource reference, WPF looks it up in the system and CODE Framework makes sure the appropriate resources have been loaded for WPF to find them. Since this uses the standard WPF system, this means the standard WPF resource lookup chain is being used. WPF first looks in the current object (the listbox in our example) to see if it defines the requested resource. If that is not the case, it looks further up in the object chain into the resources defined by hierarchical parent objects such as the view itself. It then looks into merged resource dictionaries, such as the view’s theme-specific resources. Finally, it arrives at global resources and that includes the resources defined by CODE Framework. This is where that data template is found and pulled in from.
If you consider this lookup chain, a very nifty feature becomes obvious: If you have the need to change one of those templates for a specific view, you can simply create a template of the same name (it is perfectly find to create multiple XAML resources of the same name at different levels in the lookup chain) and thus override the default template. This means that you do not give up any flexibility whatsoever by using standard templates. In fact, this not just works on a view-by-view basis, but you can override the templates on an app-global fashion. You ended up using a template across the app you do not like? No problem, just change it in a global resource file and all the views across your application change!
It is also important to realize that while all standard views are available as data templates for use in controls such as listboxes, they are actually as individual controls, which just happen to be used by those templates. So when you use a template called CODE.Framework-StandardTemplate-DataAndImage02, the system uses a template that contains a control called DataAndImage02. The exact name of the class varies by theme, but you could just use that control directly in your application by adding it straight to your XAML view definition. Note that the slight difference in names and namespaces, as well as the fact that different themes may have slightly different mappings from templates to controls, makes it difficult to use these controls directly. Instead, we recommend using a separate control as a placeholder. This control is called StandardViewPlaceholder. You can simply put that control on any view of WPF UI and set the StandardView property, and it will pull in the matching definition for the current theme, guaranteeing that it will always display the data in some meaningful way regardless of underlying differences or incompatibilities. Here’s an example use of this control:
<mvvm:StandardViewPlaceholder StandardView="Text02" />
Note that the StandardView property is strongly typed as an enum, so it is easy to see the complete list of supported standard views in IntelliSense.
Conclusion
As you start using the standard views and view-models feature in CODE Framework, you will realize that there are quite a few places where the feature is applicable. Using this feature makes it very quick to implement many user interfaces. You will find that many times, large custom interfaces have small elements (typically lists) that may be easily expressible using a standard view-model and associated templates. Do you really need a custom template to display a list of line items on an invoice? Maybe not. How about that list of addresses you display on your customer edit form? How about the different categories you want to display in a drop-down? Standard templates are applicable to all of those in many scenarios. Perhaps the standard approach is just a quick and dirty placeholder to get started, since it is so easily possible to override and change the templates on a view-by-view, or even control-by-control basis. You may end up using very simple templates that simply show a label or an icon and a label. You will probably also end up using very sophisticated standard templates that may incorporate animations and more. I encourage you to experiment with all of those!